If you're dreaming of turning your manuscript into a physical book, you're probably asking one key question: How much will it cost to print a book? Whether you're an aspiring author, a small business owner looking to create promotional materials, or someone with a passion project, understanding the costs can be overwhelming.
The price isn't just about pressing the "Print" button; it combines paper quality, print run size, binding type, and many other factors. In this blog, we'll break down the costs in a way that helps you make informed decisions, avoid surprises, and find the most cost-effective printing options for your unique project.
Let's dive into the world of book printing—no jargon, just practical advice you can use to bring your book to life.
What is the Cost of Printing a Softcover Book?
To begin with, let's look at the estimated cost of printing a softcover book. If you're looking to print a softcover (paperback) book, whether it's a novel, a guide, or any other type of publication, the printing cost in the United States can range from $2.00 to $4.00 per copy, if printed in bulk quantity.
This price can vary based on factors such as the book's size, the type of paper you choose, the color of the cover, and the binding style. Remember that this doesn't include other essential costs like cover design, ISBN registration, or pricing for shipping fees. When planning your budget, it's important to account for these additional expenses to ensure your project stays on track.
ExWhyZed, a creative print company, offers high-quality softcover book printing, also known as perfect bound books, designed for durability and a professional finish. Our services include customizable paper stocks, cover finishes, and printing options, ensuring each book aligns with the author's vision. They create books with clean, square spines using industry-standard perfect binding for a polished look.
An A5 Saddled Stitched Softback for 500 copies at Ex Why Zed can cost you $399, which means a single copy could cost you approximately only $0.80. You can request a quote from us for your requirement now!
How Much Does It Cost to Print a Hardcover Book?
Hardcover books are more expensive to print than paperbacks, but the investment can be worth it if you want a premium feel and longer-lasting quality.
Expect to pay anywhere from $5 to $10 per copy for hardcover printing. The price depends on factors like the thickness of the cover material, the type of print (full color vs. black-and-white), and the overall print quality.
If you're printing a book for a special edition or to appeal to collectors, the extra cost could be a great selling point for your readers.
What is the Cost of Printing a Spiral-Bound Book?
Spiral-bound books, such as cookbooks, workbooks, or instructional guides, are perfect for projects that need to lay flat. Printing a spiral-bound book typically costs between $4 and $6 per copy, but the final price will depend on a few variables.
The cost is impacted by the type of coil (plastic or metal), the method of printing (digital or offset), and the quality of paper used. If your book needs to be easily referenced or opened to a specific page, spiral binding is a great option.
However, note that it may come with a slightly higher price tag than traditional binding methods.
At Ex Why Zed, our opinion is that Spiral Bound books are best for company reports and not creative publications.
What Are the Factors that Influence Book Printing Costs?
Several elements come into play when examining the cost of printing a book. These factors might seem overwhelming initially, but considering them can facilitate a smoother and more financially viable publishing process. Let's examine them in depth.
1. Print Run Size: Bigger Prints, Lower Costs
When you decide how many copies to print, you determine how much you'll pay per book. Larger print runs help lower the cost per unit because the initial setup costs are spread across more books.
So, if you're printing 100 copies, the cost per book will be higher than if you were printing 1,000 copies. However, don't jump into a massive print run if you're unsure about demand. Test your market first to avoid overcommitting.
2. Paper Quality: A Balance Between Feel and Cost
The paper you choose plays a significant role in the final look and cost of your book. Higher-quality paper (think thicker or textured) will give your book a premium feel and increase the cost.
Lighter, standard paper is budget-friendly but might not provide that luxurious feel you may want for a high-end project. Consider your book's purpose and your target reader when making this choice. For example, a simple novel doesn't need luxury paper, but a photo book might.
ExWhyZed offers a variety of house papers, including Uncoated, Silk, Gloss, and Evolution Uncoated, each available in weights from 100gsm to 350gsm. For zine interiors, they recommend a maximum of 170gsm to maintain flexibility, while covers are best suited to 300gsm, as 350gsm may be overly rigid.
3. Book Dimensions and Page Count: Bigger Isn't Always Better
Larger books or those with more pages automatically increase the cost due to more materials required, including the size of the book. Expect your costs to rise if your book has a higher page count or unique dimensions.
While it may seem tempting to choose a bigger size or longer format, it's important to stick with what makes sense for your content. Plus, custom sizes or non-standard formats might incur additional setup fees.
4. Color vs. Black and White: Impact on Budget
Whether your book is in color or black and white impacts the final cost. Color printing is more expensive because it uses additional ink and a more complex process. Color is essential if your book includes illustrations, images, graphics, or photos—but prepare to pay for it.
However, for text-heavy books or novels, black-and-white printing will help keep things affordable without sacrificing quality.
5. Binding: Durability and Design Choices
Binding affects both the durability and price of your book. Perfect binding (for paperback books) is cost-effective and widely used. If you're aiming for a more professional, high-end look, hardcover binding is an option, though it adds more to your budget.
Saddle stitching works well for shorter books, but it's limited to fewer pages. Whether creating a long novel or a small booklet, your binding choice should reflect your book's content and budget.
6. Cover Design: The First Impression
The cover is your book's first impression, and it can be a significant factor in the cost. If you're looking for something eye-catching, consider finishes like embossing or foil stamping, which add a premium touch but will drive up costs.
However, a simple cover design with a matte or glossy finish keeps things sleek and more affordable. Consider your book's market and decide how much you will invest in making that first impression count.
7. Printing Method: Digital vs. Offset
Your choice of printing method also affects both cost and quality. Creative digital printing is most efficient on smaller runs. There's no setup fee, which makes it more affordable for limited quantities, but the cost per book is higher.
On the other hand, offset printing is designed for larger batches and requires a more expensive setup process, but once you're printing in bulk, the price per unit drops significantly. Think about your needs, such as short runs vs. long runs, and choose accordingly.
8. Shipping and Distribution: Budgeting for the Extras
Once your book is printed, it's time to get it into the hands of your readers. Shipping and distribution are often overlooked but can add significant charges. Shipping costs are affected by the weight of the book, the quantity you're sending, and the destinations.
If you're distributing through retailers or directly to customers, don't forget to account for inventory storage, order processing, and delivery fees. Planning ahead for these hidden costs will help ensure you don't exceed budget.
What are the Key Components of the Cost Breakdown for Publishing a book?
Having a granular perspective on the components of book publishing costs aids in strategizing your print order effectively. Suppose we consider a standard 6" x 9" paperback with 200 pages, a full-color cover, protected with gloss film lamination, and a black-and-white interior. Here's an in-depth breakdown of the possible costs, further clarified in different stages:
1. Editing and Manuscript Preparation
The manuscript must be prepared before entering the actual printing process. This phase includes proofreading, editing, formatting and even cover design—all of which contribute to the total cost of self-publishing a book. Errors in text can be quite costly if caught after the print run has been executed. These expenses may range from $500 to $3,000, depending on the editor's experience and the manuscript's complexity.
2. Printing Costs
Printing costs can be expensive, influenced by features such as print run size, the chosen printing method, book dimensions, and selected paper. A conservative estimate would cost around $2.50 to $4.00 per book for 1,000 copies, making the total printing cost between $2,500 and $4,000.
Printing Method
Print Run Size
Per Book Cost
Total Cost
Offset Printing
1000 copies
$3.00
$3000.00
Digital Printing
1000 copies
$4.00
$4000.00
Besides, if you're considering ExWhyZed for your printing needs, a 500-copy order with a 300gsm Silk cover and 130gsm Silk (Satin) inside pages would cost approximately $0.80 per book, bringing the total to $399.
3. Cover Finishing
Adding finishing touches to your book's cover can enhance its appeal but also increase the cost. Lamination, embossing, foil stamping, or spot UV coating can cost $1 to $5 per book.
4. Marketing and Promotion Spends
Although marketing and promotion aren't directly related to printing, they are essential to a book's success. The costs of marketing campaigns, social media, online ads, and book launch events can range from a few hundred to thousands of dollars.
When you choose ExWhyZed, you get plenty of benefits with your marketing and promotion spends. Our Social Media Promotion Pack is a comprehensive toolkit designed to enhance your book's visibility across various platforms.
This package includes a professionally written press release and blog post, a one-week social media calendar, a month-long social media ideas planner, tailored post suggestions for platforms like Facebook, Instagram, TikTok, and LinkedIn, 10-20 high-quality photographs of your book, and one-minute videos optimized for both landscape and portrait orientations. This pack is priced at £250, which is approximately equal to $322.49 USD.
5. ISBN and Barcodes
An International Standard Book Number (ISBN) and a barcode are necessary for retail distribution. A single ISBN costs roughly $125 or $295 for a block of ten, while barcodes may be purchased for $25 to $50 each.
6. Miscellaneous Costs
Other potential costs encompass legal fees for copyright services, possible software subscriptions, or seeking professional advice – which could be as much as $50 to $300 per hour.
Considering all these factors, let's look into the total estimated book printing prices. Below is a table for your reference:
Expense Category
Estimated Cost Range
Editing & Manuscript Preparation
$500 – $3,000
Printing Costs (Offset: $3.00 per book, Digital: $4.00 per book – 1,000 copies)
$3,000 – $4,000
Cover Finishing (Per Book: $1 - $5)
$1,000 – $5,000
Marketing & Promotion
$500 – $5,000+
ISBN (Single vs. Block of 10)
$125 – $295
Barcode
$25 – $50
Miscellaneous (Legal, Software, Professional Advice, etc.)
$50 – $300 per hour
Estimated Total Cost (Offset Printing)
$5,200 – $11,670+
Estimated Total Cost (Digital Printing)
$6,200 – $12,670+
What Are Some Cost-Saving Tips For Printing a Book?
Now that we have a detailed understanding of how much you need to pay to print your book, it's also ideal to know how to cut down expenses wherever possible. While many costs are inevitable, there are strategies to curb the expenses associated with book publishing. Let's examine these tips.
1. Print on Demand (POD)
Print on Demand (POD) services can be cost-effective, particularly for smaller print runs or first-time authors. By enabling book printing as ordered, POD eliminates the requirement of a significant upfront investment while reducing storage concerns. Companies like Amazon's KDP offer POD services that can help publish your eBook.
2. Bulk Printing Discounts and Negotiating with Suppliers
If high demand is predicted for your book, printing in bulk can considerably lower the per-unit cost. Offset printing becomes economical with larger quantities; hence, this could be a viable strategy if confident about sales projections. Simultaneously, obtaining multiple quotes from printers and negotiating with suppliers could result in discounts or better rates.
Achieve Publishing Excellence with ExWhyZed's Effortless and Cost-Effective Printing
Do you want to simplify the process of printing your book and ensure a seamless experience from start to finish? At ExWhyZed, we specialize in making book printing hassle-free, offering tailored solutions to meet your unique needs. Whether you're printing a paperback, hardcover, or spiral-bound book, we provide top-notch quality and service at competitive prices, ensuring your book is produced to the highest standard.
Choosing us means partnering with a reliable brand that understands the complexities of the printing world. We are committed to helping you bring your vision to life while keeping your budget in check. Ready to take the next step in printing your book? Contact us today to get started, and let ExWhyZed handle the details!
Conclusion
Printing a book is a complex process, with various factors contributing to the overall costs. By thoroughly understanding these factors and exploring cost-saving strategies, you can make smarter, more informed decisions that help keep your project within budget.
Strategic planning and thoughtful consideration of each aspect of the printing process will ensure your book's success and help you achieve your publishing goals without overspending. With the right approach, you can easily print your book while staying financially on track.
Frequently Asked Questions
How does print run size affect book printing costs?
A print run size indicates the number of copies intended for printing. Due to economies of scale, the cost per unit drops with a more extensive print run. This allows the printer to spread the setup costs over more units, lowering the overall cost per book.
How much does it cost to print a 200-page book?
The cost of printing a 200-page book varies based on factors like paper quality, binding, and quantity. On average, the cost of printing one copy can range from $2 to $10. The cost per unit decreases for larger quantities. Additional features like color printing or special finishes can increase the price.
How much does it cost to print a 300-page book?
Printing a 300-page book can cost anywhere from $3 to $10 per unit, depending on factors like quantity, paper quality, color options, and binding. Additional costs may apply for cover design, editing, and formatting.
How much does it cost to print a paperback book?
Printing a paperback can cost between $2 and $4 per copy, depending on factors such as the book dimensions, quality of paper, printing method, and the size of the print run.
How much does it cost to print a single book?
The average price to print a single book can greatly vary depending on factors mentioned in this blog. For a standard 200-page black-and-white paperback, the cost generally lies between $2 and $4 per copy. Conversely, the same full-color book could cost between $10 and $30 per copy. Hardcover volumes typically fetch higher costs due to additional materials and a different binding process.
In the exciting world of self-publishing, you get to tell your story. Once the manuscript is ready, it is now time to bring life to your story. This is where illustrations come in.
Finding the right illustrator is important to help make your artistic vision real. This is especially true for projects with a lot of images, like children's books and graphic novels. The mix of words and pictures draws young readers to these books. However, the process of finding the right illustrator for your book can sometimes be overwhelming.
To make it easier for you, this blog will give you an in-depth understanding of how to find an illustrator for a self-published book.
What is the Role of an Illustrator in Self-Publishing?
An illustrator brings your manuscript to life. They turn words into exciting pictures that connect with readers. It's essential to find the right illustrator for any book with images. This is especially true for photobooks and children's books, where the illustrations are just as important as the story.
Choosing the right illustrator can enhance your artistic vision. This will attract both young readers and publishers. Remember that if you are self-publishing, you are in charge of everything about your book. This includes hiring an illustrator if your project needs one.
A skilled illustrator does more than create images. They help you understand and improve your manuscript. Their artwork grabs attention, encouraging young readers to explore your story.
Good illustrations bring life to your characters and story, making them relatable, visually engaging and appealing to your audience.
Types of Illustrations for Different Genres
Think about what kind of book you are making. A children's book may need fun watercolour pictures. A graphic novel may do better with strong, bold designs.
Realistic pictures might be great for a non-fiction book. A fantasy book may ask for creative and dreamy artwork. When picking an illustrator, consider their experience in your book's genre. Check if their style fits your ideas.
Feel free to try different art forms. Digital art, watercolour, acrylics, or mixed media all have their own unique look, and one of them could be just right for your book.
How to Find an Illustrator for a Self-Published Book: Essential Steps to Get Started
Before you start looking for an illustrator, it’s important to know what you need and how much money you can spend. Understanding your artistic vision will help you find an illustrator whose style matches your book's theme. Also, think about your budget. This will affect the number of talented illustrators you can work with.
Defining Your Illustration Needs and Artwork Style
Start by imagining your characters and scenes. What art style fits your story best? Do you see bright watercolours, detailed digital art, or a simple charm in the style?
Your search becomes easier when you have a clear idea of the illustration style. Think about whether you want full-page illustrations, small spot illustrations, or a mix of both.
Understanding these details helps you share your vision well. This way, the illustrator can know and match your expectations right from the beginning.
Budget Considerations for Hiring an Illustrator
Illustrators usually charge a flat fee for each project or by the hour. Their rates can change based on their experience, how complex the work is, and what is needed for the project. Some illustrators might also take a payment plan based on royalties, especially if they think the book will do well.
When budgeting, consider how many illustrations you need, how tough the artwork will be, and if you will need any revisions. Also, consider if you want other design services like book cover design, as this can affect the overall cost.
It's important to remember that lowering quality to save money may not help your book. Finding a balance between skill and what you can afford is key.
Printing AI-Created Children’s Book Images: From First Idea to Finished Book
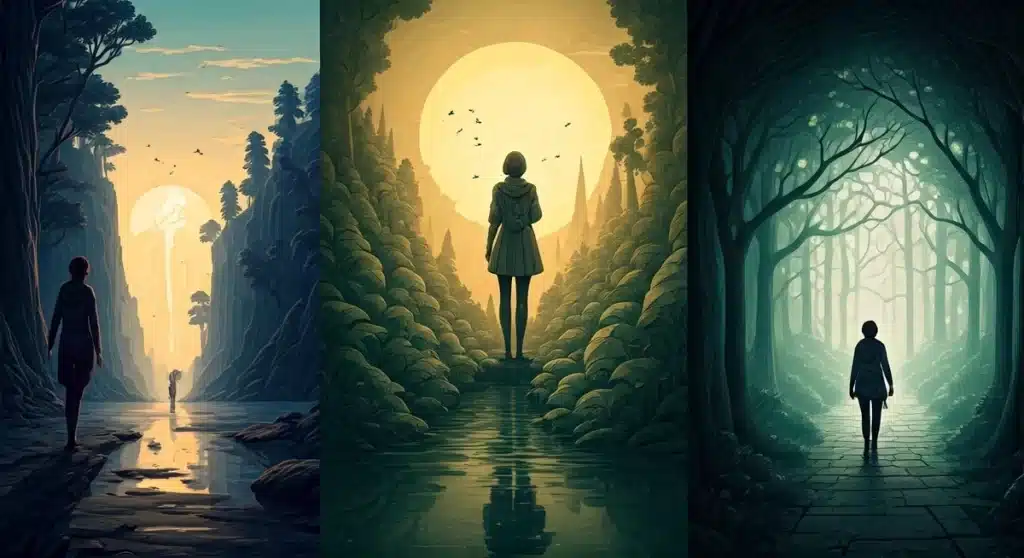
AI has created a genuinely useful new route for authors and illustrators who want to develop a children’s book but need help shaping the visual world around it. In our guide on how to use AI to illustrate a children’s book, we explored how image-generation tools can support character development, scene creation and style testing, helping creators turn a loose story idea into a more coherent visual direction. The strongest results came when AI was used thoughtfully: refining prompts, keeping characters consistent, testing illustration styles and planning images with the final printed page in mind. For self-publishers, this could reduce early creative barriers while still leaving space for personal judgment, editing and artistic control.
Our companion article on how to use ChatGPT to print a children’s book took the next step, showing how AI could help organise the wider book-making process, from structuring the story and planning page spreads to preparing artwork for professional print. We highlighted the practical decisions that still matter hugely: trim size, page count, paper choice, binding, image resolution, CMYK colour, bleed and readable layouts. Together, the two guides offered a clear path from AI-assisted concept to beautifully finished children’s book. At Ex Why Zed, we helped bridge that gap with expert file checks, flexible quantities, paper guidance, high-quality colour reproduction and dependable production support, making it easier for creators to move from digital spark to a book that feels polished, purposeful and ready to share.
Step-by-Step Guide to Finding an Illustrator
So, how do you find the right illustrator who matches your idea? Let’s look at some easy steps to understand how to find an illustrator for a self-published book. First, you need to do focused research. Then, shortlist interesting profiles and evaluate their portfolios. This journey begins by spotting possible illustrators.
Step 1: Research Potential Illustrators
Start by using the internet to find talented illustrators.
You can join online groups for this purpose. This group allows you to look at the portfolios of its members. Many children's book illustrators have their own websites, too. You can search for them based on styles, their experience, or types of illustration.
Use search engines like Google to help with your search. Try using words like "children's book illustrators," "fantasy illustrators," or "watercolour illustrators" to get better results.
Step 2: Evaluating Their Portfolio
An illustrator's portfolio is the best way to see if they are right for your project. Look closely at their art style and technique. Notice how well they express emotions in their work.
Check the details. Do their characters have a personality? Do their landscapes capture your interest? Does their graphic design or style fit with your artistic vision for your book?
Also, look for versatility in their portfolio. Have they worked on projects that are similar in genre or theme to your book? This shows their ability to adapt and help bring your manuscript to life.
Step 3: Contacting and Discussing Your Project
Once you have picked some illustrators you like, contact them with a simple and clear message. Let them know you are interested. Share a summary of your book, your ideas for the illustrations, and any special needs you have.
Send your manuscript to the illustrators so they can understand your story and suggest ideas for the visuals. During your talks, see how excited they are and if they understand your project.
Good communication is crucial. Do they listen to your thoughts and use your feedback in a positive way? Working well together is key to a successful partnership.
What are the Legal Aspects of Working with an Illustrator?
Navigating the law helps you work well and keeps your rights safe as an author. This means you need to know about copyrights, contracts, and licensing agreements. These important aspects protect you and the illustrator while you create together.
Understanding Copyrights and Licenses
Copyright usually belongs to the artist. However, when you hire an illustrator, you often get a license. This license lets you use their artwork in your book.
The type of license can be exclusive or non-exclusive. It must also explain what you can do with the artwork, like printing, digital publishing, or merchandise. Your agreement should clearly state who owns the copyright for the illustrations and what rights you have as the author.
For example, do you have the sole rights to the illustrations in your book, or can the illustrator use them elsewhere? These questions are important to include in the contract. This helps you avoid problems later on.
Drafting a Contract: Key Clauses to Include
A well-written contract protects the interests of both parties. It helps create a good working relationship.
Key parts of the contract should have:
Project scope: This should describe how many illustrations you need, their sizes, and any special requests.
Payment terms: This should explain how and when payments will be made, like if it’s a flat fee, royalties, or both.
Revisions: This should state how many rounds of changes are included in the initial fee. It should also list any costs for extra changes.
Deadlines: It’s important to set realistic deadlines for both sides. This includes feedback on the manuscript, drafts of illustrations, and revisions.
Talking to legal experts who know about publishing contracts is a good idea.
Bring Your Book to Life with Ex Why Zed
Self-publishing a book can be overwhelming, whether it’s your first time or you’ve been down the road before. The process is often time-consuming and costly, and finding the right path can feel like a maze.
At Ex Why Zed, we can turn your book idea into reality easily and fast—without the need for traditional publishing. With us, you’ll have complete control over the entire process, from concept to finished product, and get your book in hand in a short time.
We offer competitive pricing, expert advice, and personalized quotes to help you make the most of your budget while delivering high-quality results. We offer options like foil blocking, embossing, and custom sizes to differentiate your book.
Finding the right illustrator for your self-published book is crucial. It helps bring your ideas to life. Start by defining what you need and considering your budget. Then, look at different portfolios and think about any legal details. Remember, good illustrations can improve the reader's experience and add value to your book. Whether you work with a local or a remote illustrator, it's important to communicate clearly and ensure both sides understand the expectations. By taking these steps carefully, you can find an illustrator who matches your style and adds creativity to your project. Happy illustrating!
Frequently Asked Questions
How much should I expect to pay an illustrator?
Costs can change depending on experience, how complex the artwork is, and how many illustrations you need. Some illustrators have a flat fee, while others may charge by the hour or use a royalty-based payment. Talk about your budget clearly and find a fair price for both you and the illustrator.
What if the illustrator’s style doesn’t match my vision after hiring?
Clear communication is very important. Share specific feedback and allow for revisions. It’s essential to fix any issues early so that both sides are happy with the artistic direction.
How long does the illustration process usually take?
The amount of time it takes can change based on the project details. This includes how many illustrations there are, how complicated they are, and the illustrator's schedule. Talk about your timeline clearly. Set realistic deadlines to help everyone know what to expect.
Key Highlights
AI tools now allow you to create children’s book illustrations in minutes, removing traditional cost and time barriers
No formal design skills required, just structured prompts and creative direction
Ideal for self-publishing authors, educators, and creators on a budget
Enables rapid prototyping and testing of multiple visual styles
Consistency and print quality still require human refinement
Covers tools, workflows, prompts, and publishing best practices in one guide
Widely used for platforms like Amazon KDP and digital publishing
Combines speed of AI with strategic execution for professional results
Creating a children’s book has traditionally required a combination of storytelling, artistic skill, and significant investment. For many aspiring authors, illustration has often been the biggest barrier, whether due to cost, time, or difficulty finding the right artist.
Today, that landscape is shifting rapidly. With the rise of AI-powered illustration tools, authors, educators, and entrepreneurs can now generate high-quality visuals in minutes, without formal design training. What once took weeks can now be prototyped in a single afternoon.
This guide walks you through everything you need to know, from how AI illustration works to the best tools in 2026, practical workflows, prompt strategies, and how to turn your AI-generated visuals into a professionally printed children’s book.
Skip the setup headachesUsing ChatGPT or Claude? Grab our ready-made prompt that gets your artwork print-ready — bleed and all.
Yes, you can absolutely use AI to illustrate a children’s book, and many creators are already doing so successfully. AI tools can generate consistent, high-quality visuals across different styles, making them ideal for storytelling, prototyping, and even final publishing.
AI is particularly useful for:
Self-publishing authors on a budget
Rapid concept development
Creating multiple visual styles quickly
Testing ideas before investing in a human illustrator
However, while AI accelerates production, it still requires thoughtful direction, especially for storytelling consistency and print quality.
What Is AI Children’s Book Illustration and How Does It Work?
AI illustration uses artificial intelligence tools to turn text prompts into images. By analysing large datasets of art styles, these tools can generate original visuals from simple descriptions, making it easy for children’s book creators to bring ideas to life.
AI can produce a wide range of styles, from watercolour to hand-drawn looks. The key is writing clear, detailed prompts, as better descriptions lead to better results.
However, AI still needs human guidance. You’ll need to refine outputs, maintain consistency, and shape the final look to create a cohesive and engaging book.
When Should You Use AI for Children's Book Illustration?
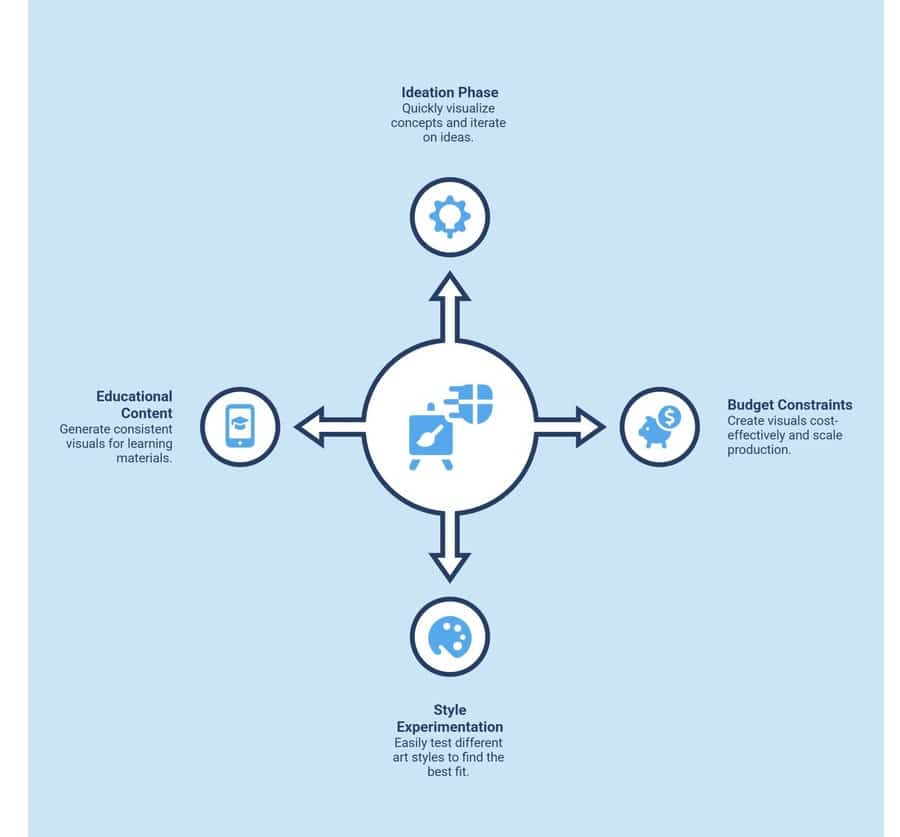
AI is most effective when you need speed, flexibility, or cost efficiency.
Use AI when:
You’re in the Ideation or Prototyping Phase
Rapid concept visualisation: AI helps you quickly turn rough ideas into visuals, making it easier to see how scenes, characters, and settings might look without waiting on manual sketches.
Faster creative iteration: You can tweak prompts and instantly generate variations, allowing you to explore different directions before finalising your concept.
Budget Constraints Limit Hiring Illustrators
Cost-effective visual creation: AI tools reduce the need for expensive initial illustration work, helping you create usable visuals at a fraction of the cost.
Scalable production: You can generate multiple illustrations without increasing costs, making it ideal for projects with tight budgets or limited resources.
You Want To Test Multiple Art Styles
Style experimentation made easy: AI allows you to switch between styles, like watercolour, cartoon, or realistic, just by adjusting your prompt.
Finding the right visual identity: By testing different looks, you can identify the style that best fits your story before committing to a final direction.
You’re Creating Educational or Short-Form Content
Quick content generation: AI speeds up the creation process, making it easier to produce visuals for short books, worksheets, or learning materials.
Consistent and repeatable visuals help maintain a uniform style across multiple illustrations, which is especially important for educational clarity and engagement.
Avoid relying solely on AI when:
You need highly unique, signature artwork
Brand identity or IP ownership is critical
Can AI Illustrations Be Used for Publishing and Printing?
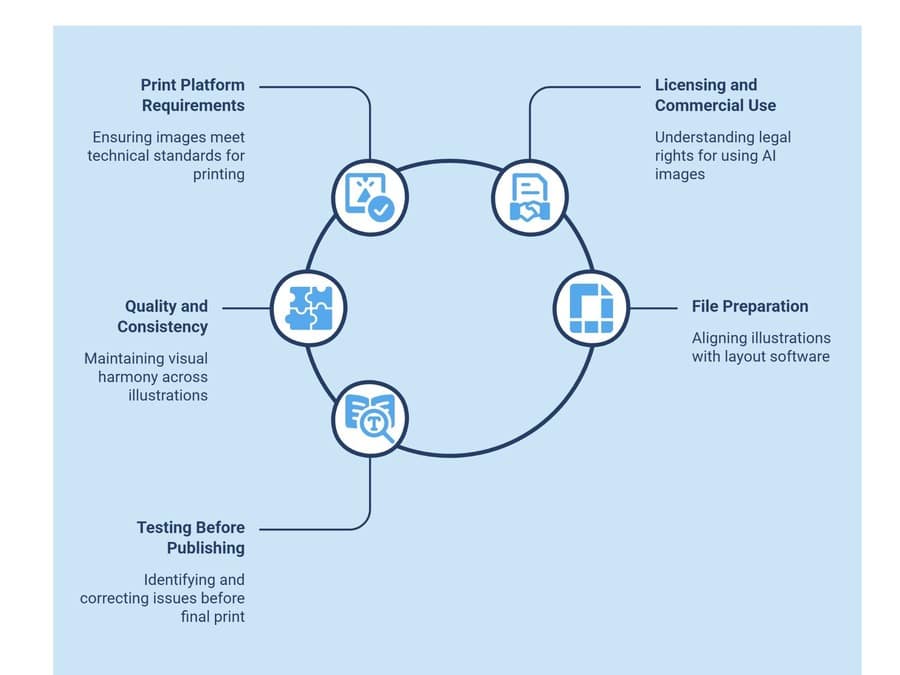
Yes, AI illustrations can be used for publishing and printing, and they are already widely used in self-published books on platforms like Amazon KDP. However, using them successfully is not just about generating images. It is about ensuring they meet technical, legal, and visual standards required for professional publishing.
Here’s what you need to consider before taking AI-generated illustrations to print.
1. Meeting Print Platform Requirements
Your illustrations must meet strict technical specifications to avoid quality issues during printing.
Most print-on-demand platforms require images to be at least 300 DPI for sharp results. Anything lower can appear blurry or pixelated when printed. You also need to match your image dimensions to your book’s trim size to avoid distortion or unwanted cropping.
For full-page illustrations, bleed and margin settings are critical. Extend your images beyond the trim line to prevent white edges, and keep important elements within safe margins.
Additional points to watch:
Use the correct aspect ratio from the start to reduce resizing later
Avoid stretching AI images, as it reduces quality
Keep file formats print-friendly, such as PNG or high-quality JPEG
Maintain consistent resolution across all pages
Double-check spine and gutter space for illustrated spreads
2. Understanding Licensing And Commercial Use
Before publishing, you need clarity on how you are legally allowed to use AI-generated images.
Each AI tool has its own licensing terms. Some platforms allow full commercial use, while others may limit usage depending on subscription level or generation method.
It is also important to understand that in most cases, you are granted usage rights, not full ownership. This distinction matters, especially if you plan to sell your book at scale or expand into merchandising.
Additional points to consider:
Verify if attribution is required by the AI platform
Check for restrictions on selling or redistributing images
Avoid generating content that mimics copyrighted styles too closely
Keep a record of the tool and prompts used for compliance
AI can generate high-quality images, but maintaining consistency across a full book requires extra effort.
Character appearance, clothing, colours, and proportions can change subtly between generations. Without control, this breaks immersion, especially in children’s books where familiarity matters.
You will likely need to refine images manually or use editing tools to align visuals across pages.
Print behaviour is another factor. Colours may shift when converting from RGB to CMYK, and small details may not translate well onto paper.
Additional best practices:
Lock character descriptions and reuse them across prompts
Create a colour palette and stick to it
Use reference images to guide consistency
Simplify overly detailed images for better print clarity
Maintain consistent lighting and scene composition
4. Preparing Files For Layout And Book Design
Even strong illustrations can fail if they are not properly integrated into your book layout.
Plan how each image fits with text, whether as full-page spreads, spot illustrations, or background elements. This helps maintain a smooth reading experience.
Before exporting, ensure all files are aligned with your layout software or publishing template.
Key preparation steps:
Align illustrations with text placement to avoid overlap issues
Use consistent spacing and alignment across pages
Export files in print-ready formats with correct colour settings
Name and organise files clearly for easy sequencing
Preview the full book layout before final export
5. Testing Before Final Publishing
Skipping this step is one of the most common mistakes.
A test print helps you identify issues that are not visible on screen, such as colour shifts, cropping errors, or low-resolution areas.
It also allows you to evaluate the overall reading experience, including pacing, visual flow, and clarity.
What to check during testing:
Colour accuracy and brightness in print
Image sharpness and detail retention
Alignment with margins and bleed
Consistency across all pages
Overall visual storytelling flow
Which Are the 5 Best AI Tools to Illustrate a Children's Book in 2026?
Choosing the right AI illustration tool depends on what you need most, whether it’s artistic quality, consistency, ease of use, or commercial safety, so understanding these differences will help you make a faster, more confident decision.
1. Midjourney
What is Midjourney best for: Best if you want visually striking, stylised illustrations where artistic quality matters more than strict control or consistency.
Key capabilities:
Produces painterly, fantasy-style visuals ideal for children’s books
Strong control over lighting, composition, and mood
Fast generation with multiple variations per prompt
Paid plans only (no longer free tier)
Commercial usage allowed under subscription
Slight learning curve due to prompt structure
2. DALL·E
What is DALL·E best for: Clean, versatile illustrations with strong prompt understanding and consistency.
Key capabilities:
Excellent at interpreting detailed prompts accurately
Supports inpainting and editing existing images
User-friendly interface
Freemium access with usage limits
Suitable for beginners and rapid prototyping
Commercial use is generally permitted
3. Adobe Firefly
What is Adobe Firefly best for: Commercial-safe, brand-aligned illustrations integrated into professional design workflows.
Key capabilities:
Trained on licensed datasets (strong legal safety)
Seamless integration with Adobe tools (Photoshop, Illustrator)
Ideal for scalable, consistent character design
Paid via Adobe subscription
Strong typography and vector capabilities
Best suited for professional workflows
4. Canva AI
What is Canva AI best for: Quick, simple, and beginner-friendly illustrations for basic children’s books.
Key capabilities:
Extremely easy to use (drag-and-drop interface)
Integrated with layout and publishing tools
Free + paid plans available
Limited artistic depth compared to advanced tools
Ideal for educators and first-time creators
Built-in templates for book layouts
5. Recraft V4
What is Recraft V4 best for: Consistent character generation and vector-style illustrations for scalable publishing.
Key capabilities:
Strong character consistency across generations
Supports vector and scalable outputs
Fast generation with clean outputs
Freemium model with paid upgrades
Ideal for maintaining visual continuity in books
Growing popularity among professional creators
Quick Comparison of AI Illustration Tools
Tool
Best For
Strength
Limitation
Ease of Use
Commercial Use
Midjourney
Stylised storybook visuals
High artistic quality, mood
Weak consistency
Medium
Yes (paid)
DALL·E
Clean, versatile illustrations
Strong prompt accuracy
Less artistic depth
Easy
Yes
Adobe Firefly
Commercial-safe design
Licensed data, brand-safe
Requires the Adobe ecosystem
Medium
Yes
Canva AI
Beginner-friendly creation
Simple, fast workflows
Limited detail/style
Very Easy
Yes
Recraft V4
Character consistency
Consistent outputs, vector support
Still evolving
Easy
Yes
Bring your children's book project to life with expert printing that elevates every image. Place your order with Ex Why Zed and print with confidence.
How to Create Children's Book Illustrations Using AI Step by Step?
Creating children’s book illustrations with AI is not just about generating images. It requires a clear process to maintain consistency, visual quality, and storytelling flow from the first idea to the final print-ready pages.
Here’s a structured workflow to help you move from concept to completed illustrations effectively.
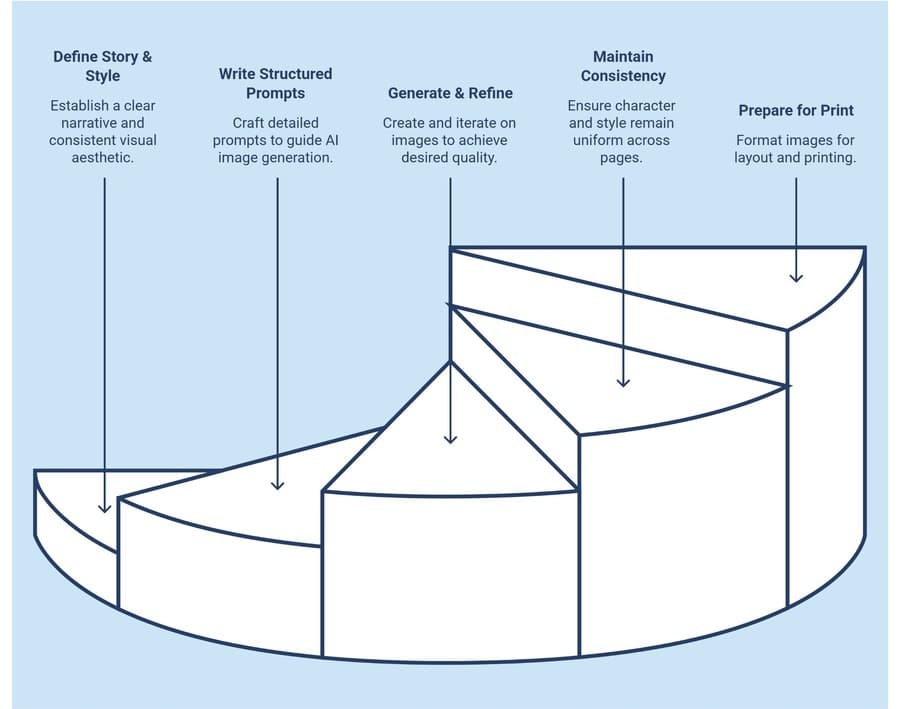
Step 1: Define The Story And Visual Style
Start by grounding your illustrations in a clear story direction.
Outline your core narrative in simple terms. Identify your main character, their goal, and the journey they go through. This ensures every visual supports the story instead of feeling disconnected.
Next, decide on a consistent visual style. Whether you choose a whimsical cartoon look, soft watercolour textures, or an educational illustration style, locking this in early prevents inconsistency later.
To strengthen this further, create a simple style reference. This can include two to three visual examples or a clear descriptive direction such as “soft pastel storybook with warm lighting.” This becomes your anchor for every image you generate.
Step 2: Write Structured And Detailed Prompts
The quality of your illustrations depends heavily on how you write your prompts.
Start with clear character descriptions. Include age, physical features, clothing, and expressions. For example, “a cheerful six-year-old girl with curly hair wearing a yellow dress.”
Then layer in the environment and mood. Define the setting, lighting, and atmosphere, such as a sunny park, magical forest, or calm bedtime scene.
Most importantly, follow a consistent prompt structure. Using a repeatable format like character + setting + style helps maintain visual consistency across all pages.
Step 3: Generate, Compare, And Refine
Avoid relying on a single output.
Generate multiple variations for each scene to explore different compositions, angles, and interpretations. This gives you options instead of forcing you to fix a weak image.
Refine your prompts based on results. If something feels off, adjust specific elements rather than rewriting everything. Small changes often lead to better outputs.
Once you identify strong visuals, improve them further through upscaling, minor edits, or corrections to enhance clarity and quality.
Step 4: Maintain Character Consistency Across Pages
Consistency is one of the biggest challenges in AI-generated illustrations.
Repeat your core character description in every prompt to reduce variation. Even small changes in wording can lead to noticeable differences in appearance.
Where possible, use reference images from earlier outputs. Many tools allow you to guide new generations using existing visuals, which helps maintain the same character look.
Pay close attention to small details like clothing, colours, and proportions. These tend to shift subtly and need manual correction to keep the character recognisable throughout the book.
Step 5: Prepare Images For Layout And Print
Before finalising your illustrations, make sure they are ready for book production.
Resize images based on your book format and layout. Whether you are using full-page spreads or smaller illustrations, planning this early avoids cropping issues later.
Ensure print quality by exporting images at 300 DPI and using high-quality formats like PNG or JPEG.
Finally, organise your illustrations alongside the text in sequence. This helps you review the storytelling flow and catch any gaps before moving to printing.
What Are the Best Prompts to Illustrate a Children's Book Using AI?
The best prompts aren’t just descriptive; they’re structured, repeatable, and specific enough to produce consistent results. Below are ready-to-use prompts you can copy, along with what kind of output you should expect:
Prompt 1: Storybook Character Introduction
Use this when: Creating your main character for the first time
Prompt: “a cute 7-year-old boy with curly brown hair, wearing red overalls and yellow sneakers, smiling, standing in a bright meadow with flowers, soft watercolour style, warm lighting, children’s book illustration, highly detailed, gentle textures”
Expected result:
Soft, storybook-style character
Warm, inviting colours
Clear focus on character design
Ideal for cover or introduction page
Prompt 2: Magical Environment Scene
Use this when: Building immersive backgrounds or fantasy worlds
Prompt: “a magical forest with glowing mushrooms, tall twisted trees, fireflies floating in the air, dreamy atmosphere, soft pastel colour palette, watercolour children’s book illustration, cinematic lighting”
Expected result:
Rich, atmospheric background
Fantasy elements with depth
Strong mood and lighting
Great for full-page spreads
Prompt 3: Character in Action Scene
Use this when: Showing story progression or movement
Prompt: “a little girl with black pigtails, wearing a yellow dress, running happily through a sunny park, butterflies around her, bright colours, cartoon style, playful mood, children’s book illustration”
Expected result:
Dynamic pose and storytelling
Bright, energetic composition
Clear emotional tone (joy/playfulness)
Works well for middle pages
Prompt 4: Consistent Character Prompt (Reusable Template)
Use this when: Maintaining character consistency across pages
Prompt template: “[character description], [specific action], [environment], same style as previous, soft watercolour children’s book illustration, consistent character design, warm lighting”
Example: “a cheerful fox with orange fur and a blue scarf, sitting and reading a book, inside a cosy treehouse, same style as previous, soft watercolour children’s book illustration, consistent character design”
Expected result:
Similar-looking character across scenes
Reduced variation issues
More cohesive book visuals
Prompt 5: Simple Educational Illustration
Use this when: Creating clean, easy-to-understand visuals
Prompt: “simple flat illustration of a smiling sun, clouds, and green hills, bright colours, minimal details, clean lines, educational children’s book style”
Expected result:
Clean, distraction-free design
Easy for young readers to understand
Ideal for early learning books
If your prompts are vague, your results will be inconsistent. But if you use structured, reusable prompts like these, AI becomes far more reliable, helping you create illustrations that actually look like they belong in the same children’s book.
Want to create a photobook yourself? Dive into our step‑by‑step guide on how to make a photobook from start to finish, perfect for photographers ready to bring their images into print.
Using AI or Canva?
Copy-paste our exact AI prompt
Making your artwork with ChatGPT or Claude? Paste one of these in, swap the [brackets] for your details, then add your text. It forces the AI to build at the right size, fill the bleed, and keep your text safe — the three things people get wrong.
ChatGPT best for illustrated artwork
Design me a [what it is — e.g. children's picture-book cover / A5 poetry-zine cover]. I'll paste my written content at the end — please illustrate and lay it out in the style of [style — e.g. warm hand-painted storybook watercolour / bold flat vector].

This has to be PRINT-READY. Follow these four rules exactly:

1. SIZE. My finished (trimmed) size is [your size — e.g. A4, 297 × 210mm]. Add 3mm of bleed to all four edges yourself, tell me the full size you've worked out, and make the image at that full size (highest resolution possible).

2. FILL THE BLEED. The background — colour, pattern or artwork — must run right to all four outer edges. No white edge, no border, no frame. The outer 3mm gets cut off, so treat it as more of the same background.

3. KEEP TEXT SAFE. Keep ALL words, titles, logos, faces and any barcode well inside — at least 5mm in from where it will be trimmed.

4. THE FILE. Give it to me as a single high-resolution JPG or PNG at 300 dpi. A flat image, not a link or editable file.

Before you generate, tell me the full image size you'll use and confirm the background reaches all four edges. Then create it.

Here is my content to include:
[paste your titles / text / details]
Claude best for clean layout & PDFs
Design me a [what it is — e.g. children's picture-book cover / A5 poetry-zine cover]. I'll paste my written content at the end — please design and lay it out in the style of [style — e.g. clean editorial / bold flat vector / warm storybook].

This has to be PRINT-READY. Follow these four rules exactly:

1. SIZE. My finished (trimmed) size is [your size — e.g. A4, 297 × 210mm]. Add 3mm of bleed to all four edges yourself, tell me the full size you've worked out, and build at that exact size, 300 dpi.

2. FILL THE BLEED. The background — colour, pattern or artwork — must run right to all four outer edges. No white edge, no border, no frame. The outer 3mm gets cut off, so treat it as more of the same background.

3. KEEP TEXT SAFE. Keep ALL words, titles, logos and any barcode well inside — at least 5mm in from where it will be trimmed.

4. THE FILE. Give it to me as ONE finished, flat, print-ready file — a PDF (best) or a high-resolution JPG/PNG at 300 dpi, at the full size. Do NOT hand it over only as HTML, SVG or an editable web page — I need a final image or PDF I can send straight to my printer.

Before you build, tell me the full size you'll use and confirm the background reaches all four edges. Then produce the file.

Here is my content to include:
[paste your titles / text / details]
You only need one number — your finished size. The prompt makes the AI add the 3mm bleed for you. Not sure it came out right? Send it to us for a free check →
How Can Ex Why Zed Help Turn AI Illustrations Into a Professionally Printed Children’s Book?
Creating AI illustrations is only the first step, turning them into a polished, print-ready children’s book is where most creators struggle. Ex Why Zed bridges that gap by transforming your generated visuals into a cohesive, high-quality book that looks professional, consistent, and ready for the market.
Why creators choose Ex Why Zed?
Specialises in producing visually rich books, including children’s titles and illustrated projects
Refines and adjusts AI visuals to ensure consistency, clarity, and print accuracy
Wide range of finishes that enhance colours, textures, and overall visual appeal
Maintains visual integrity when converting digital illustrations into print
Helps structure your book so images and text flow naturally across pages
Ensures every illustration meets professional DPI and print standards
Full control over size, format, materials, and finishing touches
Clear timelines and costs, so you can plan your project with confidence
With Ex Why Zed, your AI-generated ideas don’t just stay digital, they become a professionally crafted children’s book that feels intentional, cohesive, and ready to impress readers, publishers, or buyers.
Ready to turn your AI illustrations into a real book? Get started with Ex Why Zed and bring your story to life in print.
Conclusion
AI has fundamentally changed how children’s books can be created, making illustration more accessible than ever. However, the difference between a basic AI-generated book and a professional-quality publication lies in execution, refinement, and production standards.
Start by experimenting with tools, developing a structured workflow, and focusing on consistency. Once your concept is validated, investing in professional support can elevate your book to a level that truly stands out in the market.
FAQs
Can I publish a children’s book illustrated with AI?
Yes, you can publish an entire book using artificial intelligence tools like an AI book illustration generator or AI art generator, as long as licensing allows commercial use. Many AI image generators offer tutorials and customisation options to create content suitable for young readers.
Do AI illustrations look professional enough for books?
AI illustrations can look professional when created with advanced image-generation tools and refined prompts. A skilled AI children’s book illustrator's approach ensures clarity, balanced background elements, and a strong reading experience, though some editing may still be needed for consistent realism.
Is AI cheaper than hiring an illustrator?
Using an AI children’s book illustrator or book illustration generator is usually more cost-effective than hiring a traditional children’s book illustrator. However, pricing may still include app subscriptions, accessories, and editing costs, depending on the generators and the level of customisation required.
How do I keep characters consistent in AI illustrations?
To maintain consistency, use structured prompts, repeat descriptors, and reference images within AI image generators. Many generators and tools on platforms like Discord support customisation, helping preserve character design, background elements, and clarity across a short story or entire book.
What resolution is required for printing children’s books?
For high-quality image generation, at least 300 DPI is required to maintain clarity in print. Most AI art generator tools and image generators allow exporting high-resolution files, ensuring illustrations look sharp and engaging for young readers, including toddlers.
Which AI tool is best for beginners?
Beginner-friendly AI image generators like Canva AI or similar app-based tools offer easy steps, simple interfaces, and helpful tutorials. These platforms act as AI book illustration generators, making it easier for first-time users to create visuals with creative freedom.
Can AI replace human illustrators completely?
Artificial intelligence cannot fully replace a children’s book illustrator, as human creativity and storytelling remain unmatched. While AI children’s book illustrator tools offer speed, realism, and creative freedom, they still rely on human input to enhance the overall reading experience.
Do I need design skills to use AI illustration tools?
You don’t need advanced skills to use an AI art generator or book illustration generator, as most tools provide easy steps and tutorials. However, basic design knowledge improves customisation, clarity, and the overall quality of image generation for a polished reading experience.
Key Highlights
ChatGPT can help you plan, structure, and draft a complete children's book, but human editing is essential to refine tone and readability for young audiences.
Creating a print-ready children's book requires illustrations, layout design, and proper formatting beyond AI-generated text.
Professional tools like Adobe InDesign ensure correct page structure, bleed, and image placement for printing.
Print quality depends on paper stock, binding choice, and colour accuracy, especially for illustration-heavy books.
A professional printing partner ensures consistent output, durable materials, and reliable turnaround for both single copies and bulk runs.
Most people can write a children’s story with ChatGPT. The hard part is turning it into a real printed book that actually looks professional.
A good story alone isn’t enough. Children’s books depend on pacing, illustrations, layout, and print quality to feel complete, and this is where most creators struggle.
This guide walks you through the full process, from generating a story with ChatGPT to producing a polished, print-ready children’s book you can confidently share.
Skip the setup headachesUsing ChatGPT or Claude? Grab our ready-made prompt that gets your artwork print-ready — bleed and all.
What ChatGPT Can and Cannot Do in a Children’s Book Workflow?
ChatGPT can accelerate the early stages of creating a children’s book, but it cannot take a project from idea to print-ready product on its own. Understanding where it adds value and where human input is essential is key to producing a book that feels complete and professional.
What AI handles well: ChatGPT is highly effective for generating story ideas, drafting simple narratives, creating character concepts, and experimenting with tone or themes. It helps overcome blank-page friction and speeds up the initial writing process.
What still needs a human: Pacing, emotional nuance, age-appropriate language, and overall storytelling quality require human judgment. More importantly, illustrations, visual consistency, and layout decisions cannot be fully handled by text-based AI alone.
What’s needed before the book is printable: A print-ready children’s book demands structured formatting, aligned text and visuals, proper page design, and the right print specifications. These elements ensure the book looks polished, cohesive, and suitable for physical production, something AI alone cannot finalise.
How to Turn a ChatGPT Idea Into a Usable Story Draft?
A structured workflow ensures you get usable, high-quality output instead of scattered ideas. When you approach this step-by-step, ChatGPT becomes far more effective as a creative assistant rather than just a text generator.
Follow these practical steps:
Step 1: Generate a Story Idea and Theme
Define the story’s purpose, tone, and age group clearly to get usable output from the start. Example: “Write a calming bedtime story for 4–6-year-olds about kindness and sharing.”
Step 2: Create Characters and Story Structure
Establish a simple framework with a main character, goal, conflict, and resolution to guide the narrative. Example: “Create a 3-part story with a beginning, problem, and happy ending about a shy rabbit learning to make friends.”
Step 3: Write the First Draft Using ChatGPT
Generate the draft with clear constraints on tone, language, and reading level to match your audience. Example: “Write this story using short, simple sentences for 5-year-olds with a playful, warm tone.”
Step 4: Edit and Refine the Story
Improve clarity, flow, and emotional impact by removing repetition and simplifying language. Example: Replace repeated phrases and shorten long sentences to make the story easier to read aloud.
Step 5: Break the Story into Pages
Structure the story into pages or spreads to ensure proper pacing and visual storytelling. Example: Divide the story into 24-32 pages, keeping one key idea or moment per page.
By following this process, you're not just generating a story; you're building a structured, reader-ready foundation that's far easier to refine, illustrate, and publish successfully.
Ready to turn your story into a beautifully printed book? Check out Ex Why Zed Children's Book Printing for professional-quality results, fast turnaround, and expert support at every step.
How to Create Illustrations for a ChatGPT Children's Book?
Before generating illustrations, it’s important to approach them as a structured system rather than isolated images. Consistency in style, character design, and layout is what transforms individual visuals into a cohesive children’s book that feels professionally designed and ready for print:
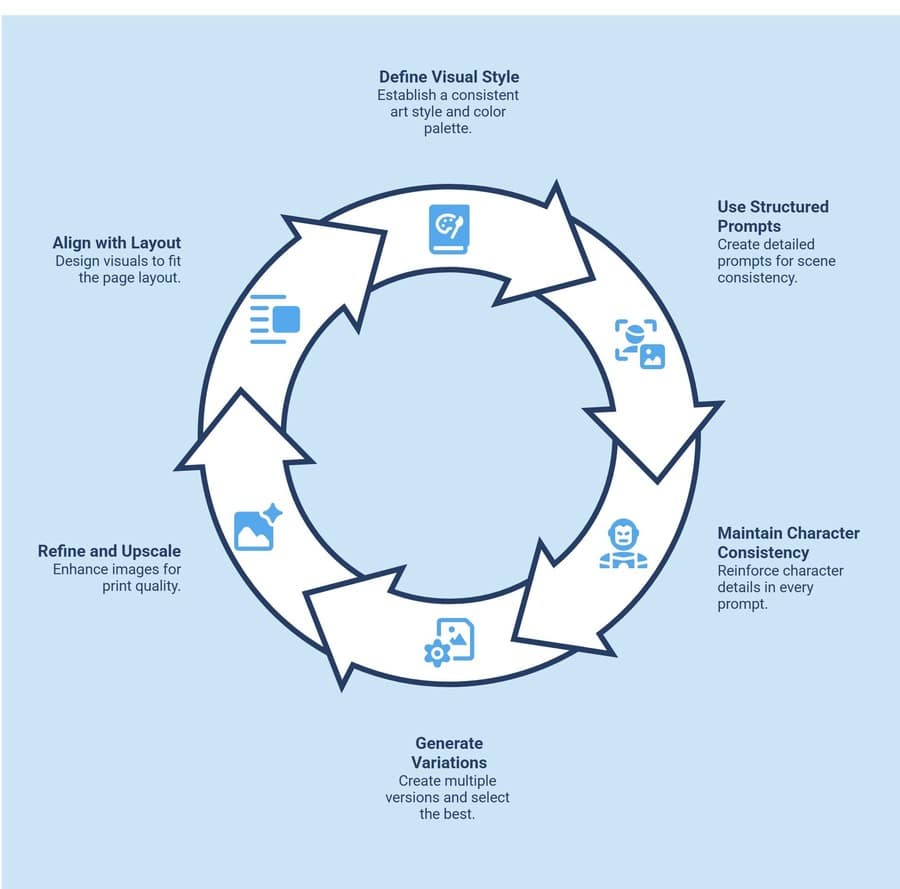
1. Define a Clear Visual Style Before Generating Images
Start by locking in a specific art style, colour palette, and mood to ensure consistency across all illustrations. Example: “Watercolour style, soft pastel colours, warm lighting, child-friendly characters with rounded features.”
2. Use Structured Prompts for Scene Consistency
Generate illustrations scene-by-scene using detailed prompts that include character traits, environment, and mood. Example: “A small brown rabbit wearing a red scarf standing in a forest at sunset, soft lighting, same character style as previous image.”
3. Maintain Character Consistency Across Pages
AI tools can vary outputs, so you need to reinforce character details in every prompt to avoid visual inconsistency. Example: Repeat defining traits like clothing, colours, and proportions in every prompt to keep the character recognisable.
4. Generate Variations and Select the Best Outputs
Create multiple versions of each scene and curate the strongest ones rather than relying on a single output. Example: Generate 3-5 variations of one illustration and select the one with the best composition and clarity.
5. Refine and Upscale for Print Quality
Raw AI outputs often need enhancement to meet print standards, including resolution and sharpness. Example: Upscale images to 300 DPI and adjust brightness/contrast to ensure colours print accurately.
6. Align Illustrations with Page Layout
Design visuals with your book layout in mind so text and images work together without clutter. Example: Leave negative space in illustrations where text will be placed on each page.
The difference between average and professional-looking children’s books lies in how consistently and intentionally the illustrations are created, refined, and aligned with the story.
Using AI or Canva?
Copy-paste our exact AI prompt
Making your artwork with ChatGPT or Claude? Paste one of these in, swap the [brackets] for your details, then add your text. It forces the AI to build at the right size, fill the bleed, and keep your text safe — the three things people get wrong.
ChatGPT best for illustrated artwork
Design me a [what it is — e.g. children's picture-book cover / A5 poetry-zine cover]. I'll paste my written content at the end — please illustrate and lay it out in the style of [style — e.g. warm hand-painted storybook watercolour / bold flat vector].

This has to be PRINT-READY. Follow these four rules exactly:

1. SIZE. My finished (trimmed) size is [your size — e.g. A4, 297 × 210mm]. Add 3mm of bleed to all four edges yourself, tell me the full size you've worked out, and make the image at that full size (highest resolution possible).

2. FILL THE BLEED. The background — colour, pattern or artwork — must run right to all four outer edges. No white edge, no border, no frame. The outer 3mm gets cut off, so treat it as more of the same background.

3. KEEP TEXT SAFE. Keep ALL words, titles, logos, faces and any barcode well inside — at least 5mm in from where it will be trimmed.

4. THE FILE. Give it to me as a single high-resolution JPG or PNG at 300 dpi. A flat image, not a link or editable file.

Before you generate, tell me the full image size you'll use and confirm the background reaches all four edges. Then create it.

Here is my content to include:
[paste your titles / text / details]
Claude best for clean layout & PDFs
Design me a [what it is — e.g. children's picture-book cover / A5 poetry-zine cover]. I'll paste my written content at the end — please design and lay it out in the style of [style — e.g. clean editorial / bold flat vector / warm storybook].

This has to be PRINT-READY. Follow these four rules exactly:

1. SIZE. My finished (trimmed) size is [your size — e.g. A4, 297 × 210mm]. Add 3mm of bleed to all four edges yourself, tell me the full size you've worked out, and build at that exact size, 300 dpi.

2. FILL THE BLEED. The background — colour, pattern or artwork — must run right to all four outer edges. No white edge, no border, no frame. The outer 3mm gets cut off, so treat it as more of the same background.

3. KEEP TEXT SAFE. Keep ALL words, titles, logos and any barcode well inside — at least 5mm in from where it will be trimmed.

4. THE FILE. Give it to me as ONE finished, flat, print-ready file — a PDF (best) or a high-resolution JPG/PNG at 300 dpi, at the full size. Do NOT hand it over only as HTML, SVG or an editable web page — I need a final image or PDF I can send straight to my printer.

Before you build, tell me the full size you'll use and confirm the background reaches all four edges. Then produce the file.

Here is my content to include:
[paste your titles / text / details]
You only need one number — your finished size. The prompt makes the AI add the 3mm bleed for you. Not sure it came out right? Send it to us for a free check →
How Much Does It Cost to Print a Children's Book in the UK?
It's important to understand the cost factors involved so you can plan realistically. Printing a children's book in the UK varies based on size, format, quantity, and quality choices, all of which directly impact your final budget.
Cost Factor
Typical Range (UK)
What It Means in Practice
Print Quantity
£2 - £10 per book
Larger print runs reduce cost per copy, while small batches (print-on-demand) are more expensive per unit.
Book Size & Format
Varies by trim size
Square or custom sizes cost more than standard portrait formats due to the complexity of printing and cutting.
Page Count
£0.01 - £0.05 per page
More pages increase printing cost, especially for full-colour illustrated books.
Colour vs Black & White
£3 - £8 extra per book
Full-colour printing is standard for children's books but significantly raises overall cost.
Paper Quality
£0.50 - £3 extra per book
Thicker, high-quality paper improves durability and visual appeal but increases production costs.
Binding Type
£1 - £4 per book
Paperback is cheaper, while hardcover adds durability and perceived value at a higher cost.
Illustration Costs
£50 - £200+ per illustration
Hiring an illustrator can be one of the biggest expenses, depending on style and experience.
Design & Layout
£50 - £300 (one-time)
Professional formatting ensures print-ready files and reduces costly errors during production.
Estimated Total:
Low-budget (POD + AI tools): £3 - £8 per book
Mid-range (small print run): £8 - £15 per book
High-quality (professional print + illustrator): £15 - £30+ per book
Understanding these costs helps you make smarter decisions about where to invest, whether it's higher print quality, better illustrations, or keeping production lean for testing and early sales.
How to Make a Children’s Book Print-Ready?
Once your story and illustrations are complete, the next crucial step is turning everything into a print-ready format. This stage goes beyond simple layout; it ensures your book looks professional, prints accurately, and delivers a smooth, visually appealing reading experience for children.
1. What Book Size and Layout Work Best for Children’s Books?
Common formats include:
Square books for younger audiences
Landscape layouts for visual storytelling
Portrait formats for structured content
Your choice affects both readability and production cost.
2. How to Set Up Your Book Files for Print?
Adobe InDesign is the industry standard for print layout. It gives you full control over how your final file will appear in print.
It allows you to:
Set bleed and margins accurately
Control typography and spacing
Prepare files for professional printing
3. How to Make Text Easy for Children to Read
Typography directly affects readability.
Use large, clear fonts
Maintain strong contrast
Ensure consistent spacing
This improves both readability and visual appeal.
4. Structure and Prepare a Print-Ready PDF
Before printing, your file must be correctly prepared.
Export in CMYK colour mode
Ensure 300 DPI resolution
Include bleed settings
Embed all fonts
Skipping this step often leads to print errors. Reviewing professional resources on print-ready file setup and binding preparation can help ensure accuracy.
How to Choose the Right Printing Setup for Your Children’s Book?
Once your book is finalised, printing becomes a strategic decision, not just a technical step. The choices you make here affect cost, quality, durability, and distribution, so it’s important to align your printing setup with your goals and audience.
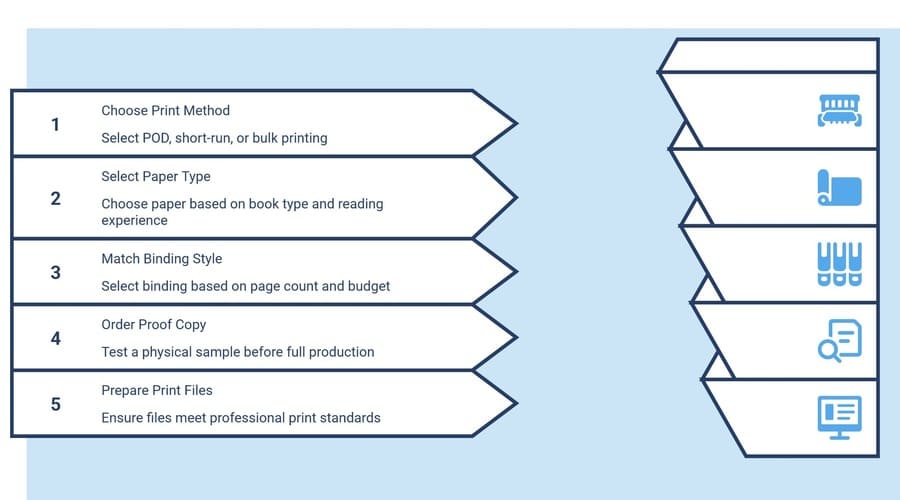
1. Print Method: POD vs Short-Run vs Bulk
Choose a printing approach based on volume, risk, and distribution plans. Example: Use print-on-demand (POD) for testing or selling online with no upfront inventory, short-run (50–200 copies) for small launches, and bulk printing (500+) for lower per-unit cost when demand is proven.
2. Paper Choice Based on Book Type
Select paper that complements the reading experience and illustration style. Example: Use thick, coated paper (e.g., 150–170 gsm silk or gloss) for colourful picture books, and lighter uncoated paper for text-heavy early readers to reduce glare and cost.
3. Binding Based on Page Count and Budget
Match binding style to durability needs, page count, and positioning (budget vs premium). Example: Saddle stitch for books under 32 pages, perfect binding for standard paperbacks (40–80 pages), and hardback for premium editions or gift-focused children’s books.
4. Always Order a Proof Copy First
Test a physical sample before committing to a full print run to catch layout, colour, or material issues. Example: Order a single proof copy to check colour accuracy, margins, text readability, and overall finish before approving final production.
5. Print File and Colour Preparation
Ensure your files meet professional print standards to avoid costly errors. Example: Export in CMYK colour mode, use 300 DPI images, include bleed (typically 3 mm), and follow the printer’s exact PDF specifications.
The right printing setup is what separates a basic output from a book that feels intentional, durable, and ready to sell or share at a professional standard.
What Mistakes Should You Avoid When Turning a ChatGPT Story Into a Real Book?
Using ChatGPT can significantly speed up the writing process, but relying on it without the right approach often leads to flat, generic, or unusable results. Understanding the most common mistakes helps you avoid extra editing, improve quality, and create a book that actually connects with young readers.
1. Relying on Vague Prompts
One of the biggest mistakes is using unclear or generic prompts like "write a kids' story." This usually results in bland, unfocused output.
What to do instead: Be specific about age group, tone, theme, and purpose. Clear prompts produce clearer, more usable stories.
2. Skipping Story Structure
Jumping straight into generating a full story without defining characters, conflict, and resolution often leads to messy or confusing narratives.
What to do instead: Build a simple structure first, main character, goal, problem, and ending, before asking for a full draft.
3. Overlooking Repetition and Generic Writing
ChatGPT-generated content can feel repetitive or predictable when used without review, reducing engagement among young readers.
What to do instead: Edit actively, remove repeated phrases, simplify language, and add unique touches to make the story feel fresh and intentional.
4. Ignoring Age-Appropriate Language
Not tailoring vocabulary and sentence length to your target age group can make the story either too complex or too simplistic.
What to do instead: Always define the reading level and adjust sentence length, tone, and word choice accordingly.
5. Treating Text and Illustrations Separately
Many creators focus only on the story and think about visuals later, creating a disconnect between pacing and storytelling.
What to do instead: Plan with illustrations in mind, write scenes that naturally translate into visuals and leave space for imagery.
6. Skipping the Editing Phase
Publishing or finalising a draft directly from ChatGPT without refinement yields low-quality results.
What to do instead: Review for flow, clarity, emotional impact, and read-aloud rhythm before moving to layout or design.
7. Expecting a Finished Book in One Go
Trying to generate the entire book in a single prompt often results in inconsistent tone and structure.
What to do instead: Work step-by-step, idea → structure → draft → edit → layout for better control and higher quality output.
Avoiding these mistakes ensures you're not just using ChatGPT for speed, but using it effectively to create a children's book that feels thoughtful, engaging, and professionally crafted.
Why Ex Why Zed Is Ideal for Printing Children's Books?
Turning a finished file into a book that actually looks and feels professional is where most projects break down. Ex Why Zed is built for this exact stage, helping creators move from print-ready PDFs to consistently high-quality, physical books without costly errors.
Why creators choose Ex Why Zed?
Fast turnaround (3–7 working days) to keep production timelines tight
Seamless support for Adobe InDesign and print-ready PDF workflows
Pre-print file checks to catch layout, bleed, and formatting issues early
Flexible print runs, from one-off copies to large-scale bulk orders
Extensive paper stocks and binding options tailored to children’s books
Accurate, consistent colour reproduction across every copy
Reliable print quality with professional-grade finishing
Reduced risk of production errors that affect final output
With Ex Why Zed, your project doesn’t just get printed, it’s produced to a standard that feels intentional, cohesive, and ready for readers.
ChatGPT makes it easier than ever to start writing a children's book, but the real value lies in how you develop that idea into a finished product. A well-structured story, supported by thoughtful illustrations and accurate formatting, creates a book that feels complete and professional. By following a clear process and paying attention to print preparation, you can avoid common pitfalls and produce a book that reflects your original vision. Taking the time to refine each stage ensures your final output is not just readable, but something you can confidently share, publish, or present.
FAQs
1. Can ChatGPT help promote a children's book on social media?
Yes, ChatGPT can assist in creating engaging social media captions, ad copy, and storytelling hooks using artificial intelligence. While it supports marketing ideas, you'll still need human creativity to align messaging with your book's tone and audience expectations.
2. How does ChatGPT ensure the right style of a children's book?
As a language model developed by OpenAI, ChatGPT can adapt its style to that of a children's book through prompts. However, you must refine tone, simplify punctuation, and ensure consistency so the final story feels natural and age-appropriate.
3. What tools can improve illustrations for a children's picture book?
Tools like MidJourney and Photoshop can enhance visuals for a picture book, from concept generation to final editing. AI helps with drafts, while design tools refine details such as the front cover, ensuring a polished, cohesive visual experience.
4. What additional pages should a professionally printed children's book include?
Beyond the story, include elements like a front cover, title page, and dedication page to give your book a complete feel. If publishing on Amazon, these details improve presentation, credibility, and overall reader experience.
5. Is it possible to fully automate writing and illustrating a child's book using ChatGPT?
While the use of AI can automate drafting and basic visuals, full automation isn't practical. Tools can generate stories about characters like Lily, but human input is still needed for emotional depth, illustration consistency, and final print-ready quality.
Imagine holding your own comic book in your hands, its pages filled with characters and stories you’ve brought to life. It’s an exciting prospect, but the technical aspects of printing can initially feel overwhelming. From choosing the right paper to understanding print layouts and binding options, the process may seem complex, especially for new publishers.
This guide simplifies each step, helping you turn your vision into beautifully printed comic books. By the end, you’ll be ready to print a professional-looking comic without unnecessary costs or complications. Let’s dive in and bring your comic book dream to life!
Step-by-Step Guide to Print Your First Comic Book
Step 1: Preparing Your Comic for Printing
Your journey to bringing your comic to life begins with preparing it for printing. This stage can feel overwhelming, especially when faced with decisions about size, layout, and technical details like trim lines, bleed, and important content in quiet areas. These elements might seem minor, but they’re crucial for ensuring your printed comic matches your creative vision.
While modern printing techniques have made the process more accessible, a solid understanding of these basics helps avoid common pitfalls. It ensures your comic looks as stunning in print as it does in your imagination.
Step 2: Design and layout tips
Designing a captivating comic requires thoughtful planning and a clear understanding of the narrative flow. Here are some tips that can help with how to print your own comic book:
Sizing: The size of your comic will affect your artwork. Standard comic sizes in the United Kingdom, A4 (8.3" x 11.7") and A5 (5.8" x 8.3") are standard. In other countries like the United States, comic books typically measure 6.7″ x 10.2″, while in Japan, manga comics are usually 5″ x 7.5″.
Artwork: Design your artwork with trim lines, bleed, and quiet areas in mind to ensure optimal print quality.
CMYK colour: Computers display red, Green, and Blue (RGB), while printers use Cyan, Magenta, Yellow, and Key/Black (CMYK colour). Ensure your designs are converted to CMYK before printing for accurate colour representation.
Image resolution: Use a resolution of at least 300 dpi (dots per inch) for crisp and clear images.
Font choice: Select legible fonts that complement your artwork.
Step 3: Choosing the right format
Choosing the right format starts with deciding the size of your comic. In the UK, standard comic book sizes include A4 (8.3" x 11.7") or the smaller B5 (6.9" x 9.8"). The size you select can greatly impact your comic's market appeal and how it’s displayed in comic book shops.
Here’s a look at what each size has to offer:
Comic Sizes
Width (mm)
Height (mm)
UK Standard
157
240
US Standard
170
260
Manga Standard
127
191
B6
125
176
DL
99
210
210 square
210
210
A4
210
297
A5
148
120
Custom sizes may need additional adjustments, so it’s wise to settle on your preferred format early in the process.
Colour vs. black-and-white printing
Choosing between colour and black-and-white (monochrome) printing is important in the comic printing process. Here’s what to consider:
Aesthetic appeal: Colour comics can be visually striking, adding depth to the story and enriching the overall reading experience.
Artistic style: Certain genres, such as noir or vintage or specific storylines, may be better suited to a monochrome presentation.
Costs: Black-and-white printing is generally more affordable than colour printing.
Get in touch with Ex Why Zed and start turning your comic into reality. Get a Quote
Bleed, trim, and safe zones.
Understanding the concept of bleed, trim, and quiet (or safe) zones is essential when designing a print-ready comic. These elements help ensure precise printing and proper design placement.
Bleed: This is the area extending beyond the trim lines, ensuring there are no white edges after the final trimming. The bleed typically measures 0.125 inches.
Trim: This marks the final size of your comic after the bleed has been cut off.
Quiet (Safe) Zone: This refers to the area inside the main body of your page where all important elements should be placed to prevent them from being cut off during trimming.
Here’s a simplified representation of these key aspects:
Design Area
Description
Bleed
Necessary to avoid unwanted white borders in your final product.
Trim
This is where your comic will be cut, removing the bleed area.
Quiet Zone
Ensure none of your core design elements come within these boundaries.
Step 4: Paper Quality & Types
The quality and types of paper you choose can greatly affect your comic book's display, durability, and overall look and feel, especially if you want a sketch cover.
Different paper types can create various aesthetics, from the shiny gloss often seen in superhero comics to the more rustic charm of vintage styles. Additionally, your paper choice's weight, texture, and finish impact how readers experience your comic. Let’s explore the different paper grades and how to choose the right one for your comic.
Understanding different paper grades
Paper quality is categorised into different grades, each with its own unique characteristics. Here are the most common ones used in comic printing:
Gloss: This paper has a shiny finish, enhancing contrast and making the artwork stand out.
Silk: Also known as satin, this paper is the industry standard for printing, providing accurate, high-quality results.
Uncoated: With a rougher texture, this paper gives a vintage feel with slightly muted colours and a more natural look.
Each publisher can choose from a broad range of weights for every type of paper, affecting the thickness and robustness of the pages.
Paper Type
Description
Gloss
Offers shiny and visually striking results; Best for vibrant, full-colour comics.
Silk
It balances colour saturation and readability. It is popular for its affordability and versatility.
Uncoated
Delivers a rustic and tactile feel, Ideal for vintage-style or black-and-white comics.
Selecting the right paper for your comic book
There’s no hard-and-fast rule for choosing the best paper for your comic. Your decision should reflect your specific goals, your audience's preferences, and your budget.
If you're aiming for a classic comic look with a shiny, vibrant cover, gloss paper for the cover and satin for the interior pages would be an excellent combination. Uncoated paper is ideal for a more eco-friendly, unique, and rustic feel, especially for monochrome comics. If your comic features heavy ink coverage or lots of dark colours, opting for a thicker, higher-quality paper is recommended to prevent any see-through or bleed-through issues. The success of your comic largely depends on how well your paper choice aligns with the overall experience you want to offer your readers.
Ex Why Zed provides a wide range of high-quality paper options tailored to suit every comic book style, whether you’re looking for a bold, glossy finish or a subtle, uncoated look for a vintage feel.
Printing technologies have advanced greatly, introducing various printing methods, each with its own advantages. Two commonly used processes are Digital Printing and Offset Printing, and both can greatly influence the price, speed, quality, and overall production of your comic. Choosing the right method of printing can improve your publication's quality while aligning with your budget. Let’s take a closer look at these two primary printing methods.
Digital Printing
Digital printing technology is fast and cost-effective, making it ideal for high-quality short-run print jobs. It works by converting digital files directly into print without the need for plates. Some key advantages include:
Cost-effectiveness: With no plates to set up, production costs are significantly lower, especially for short runs.
Speed: Digital printing offers quick turnaround times, getting your comics to the market faster.
Versatility: It allows easy updates and customisation of content.
However, digital printing may not be the best choice for large print runs, as the costs can rise quickly for higher volumes.
Offset Printing
Offset printing, also known as lithography, is a traditional method renowned for its high-quality output. In this process, ink is transferred onto plates, which then press against the paper, creating sharp and vibrant images. Key benefits include:
Quality: Offset printing delivers superior colour reproduction, which is ideal for comics that aim to provide a premium experience.
Cost-effective for large runs: While initial setup costs can be high due to plate creation, the per-unit cost decreases significantly for larger print runs.
Flexibility: It supports a wide range of paper types, finishes, and special inks.
However, offset printing can be costly and time-consuming for smaller projects.
Which method is best for your comic book?
Every comic book is one-of-a-kind, and the perfect printing method depends on your particular requirements. If you're working with a limited budget, launching a new series, or requiring fewer copies, digital printing would be your best bet.
On the other hand, offset printing could offer better cost-effectiveness and higher quality for established publishers requiring large runs. Understanding and aligning your printing needs with the appropriate method will ensure optimal results for your comic book printing project.
Binding Options
Binding is the process of securing loose pages into a book. Primarily, three binding methods are used for comic books:
Your preferred binding option primarily depends on the page count of your comic, its overall aesthetics, and how you want your readers to experience it.
Let us understand each of these binding methods in detail to aid in choosing the one that suits your comic book the best.
Staple binding (aka Saddle Stitching or Wire Stitching)
Staple, or saddle-stitched (also known as saddle-stitched) binding, is one of the most common binding methods. It involves folding the pages of the comic in half and fastening them together with staples in the centrefold. Key points of this method include:
Page Count: Suitable for comics with a lower page count (generally under 64 pages).
Cost-Effective: Comparatively cheaper than other binding methods.
Appearance: The flattened spine allows the book to lay flat, making it easy to read, but it doesn't offer room for printing the comic's title or author.
Application
Consideration
Number of Pages
Up to 64 pages
Pricing
More economical
Appearance
Flat spine, no printing on spine
Perfect binding
Perfect binding offers a higher-end look, making it ideal for perfect-bound comic books, graphic novels, or anthology collections. This process entails glueing the pages to a flat spine, creating a seamless, square-edged, book-like appearance. It is essential to understand that perfect binding requires a minimum number of pages. Here’s what to note about perfect binding:
Page Count: Ideal for books containing between 40 to 400 pages.
Pricing: More expensive due to the premium appearance and complex process.
Appearance: A square spine allows title or author printing, showcasing a professional finish.
Application
Consideration
Number of Pages
Between 40 to 400 pages
Pricing
More expensive
Appearance
Square spine with printing option
Hardcover (Case Bound) binding
Hardcover or case-bound binding is primarily used for special editions or collector’s items, presenting a high-quality, robust finish associated with hardcover books. In this binding method, pages are stitched together and then attached to a hardcover. Features of this method include:
Page Count: Suitable for comics with higher page counts, similar to perfect binding.
Cost: It is one of the most expensive binding methods due to its increased durability and premium look.
Appearance: A hard, protective cover lends the comic an upscale, book-like feel.
Application
Consideration
Number of Pages
Minimum of 40 pages
Pricing
Highest cost
Appearance
Premium feel and look
How to Find the Right Print Service?
Choosing the right online printing service is just as important as the careful preparation that goes into creating your comic book.
Online vs. Local Printers
Convenience: Online printers allow you to place orders, submit files, and proof from home, while local printers require travel.
Client Support: Local printers often provide face-to-face customer service, but online printers typically offer strong support through phone or chat.
Pricing: Online printers generally offer more competitive rates due to lower overhead costs.
Turnaround Time: High-quality online printers can often provide faster turnaround and direct delivery to your doorstep.
We specialise in printing premium comic books, offering flexibility with no minimum order requirements and the option to print test copies.
When comparing various printing services, don't fall into the trap of basing your decision solely on pricing. Make sure to consider other factors that could influence the final outcome of your comic book. Here’s a quick guide on what to look for:
Criteria
Consideration
Pricing
Consider quality against cost. Cheaper isn't always better.
Experience
Look for a printer with a proven track record in comic book printing, emphasising quality and punctuality.
Customer service
Assess response times, ease of communication, and willingness to assist or advise.
Additional Services
Some printers may offer extras like online proofing, file checks, and even design services.
Delivery options
Check for the availability of standard, express, national, and international delivery options.
From Concept to Print: Your Comic Journey with Ex Why Zed
At Ex Why Zed, we take the hassle out of comic book printing. From free paper samples that allow you to feel and see the options firsthand to detailed setup guides and the chance to print a test copy, we ensure your project is set up for success.
Our team is always on hand to offer personalised support and answer any questions, ensuring you’re confident throughout the process. With no minimum order and the flexibility to print just the number of copies you need, you’re in control. Plus, we offer bespoke sizing to make your comic truly unique.
Get a quote and bring your comic into the hands of your readers!
Printing A Comic in the USA - The Ultimates Guides
Want to Create a Comic Book That Actually Hooks Readers? Start Here.
Ever wondered what separates a good comic from one that sticks with readers long after the last panel? This deep dive into comic book fundamentals—covering everything from character arcs to panel layouts—cracks open the craft behind visual storytelling that packs a punch.
25 Comic Book Ideas That’ll Actually Spark Your Next Big Story
If your sketchbook is full but your brain feels blank, this guide is the creative jumpstart you need. Packed with 25 genre-spanning comic book ideas—from superhero origin flips to cosmic dream manipulation—this post isn’t just a list, it’s a blueprint for storytelling greatness.
So, You Want to Make a Comic? Here's How to Actually Do It Right
Whether you’re going digest-sized for a zine-style vibe or stretching into a bold magazine format, the trim size affects everything from layout to visual pacing to shelf appeal. This in-depth guide explores the most common comic sizes—from Golden Age classics (7.75" x 10.5") to compact digest formats (5.5" x 8.5")—and shows how creators can use dimensions as a deliberate storytelling tool.
Final Thought
Printing your comic can be an exciting endnote to your creative process, opening a new chapter in networking and marketing your unique narrative and artistry. Equipped with this comprehensive guide, you now have the tools to print a remarkable comic book using Adobe Photoshop and get your story out there!
Remember, key decisions regarding your comic's format, design, and layout play a significant role in creating an appealing printed product. Your choice of paper types and quality, printing method, binding style, and the right print service are equally crucial in translating your vision onto the pages.
It's important to balance quality, cost, and functionality in your choices throughout the printing process. The first thing to consider is whether you're publishing your first mini-comic or releasing a complete graphic novel. Understanding the ins and outs of printing can transform complexity into an enjoyable, rewarding journey. Now, you're all set to watch your imaginative narratives and characters come to life through a professionally printed comic book!
Frequently Asked Questions
What is the cheapest way to get into comics?
The cheapest way to get into comics is by using digital printing for small runs, choosing affordable paper, and opting for simple binding like saddle stitch. Saddle stitching or staple binding is more cost-effective than perfect binding which in turn is a lot cheaper than hardback.
Silk and Gloss papers are slightly cheaper than Uncoated.
Editing the number of pages also helps bring the cost down - less paper and printing equals a lower print price.
Are comics printed in A4?
Sometimes, although comics are generally not printed in A4 size. Standard comic book sizes are usually smaller sizes, like 6.7" x 10.2" in the US or A5 (5.8" x 8.3") in the UK. However, A4 can be used for specific formats or indie projects.
How to print a comic book at home?
To print a comic book at home, design your pages using software like Adobe InDesign or a similar tool. Print the pages on high-quality paper, ensuring they are correctly formatted. Bind the pages together using stapling, perfect binding, or other DIY methods. Finally, trim the edges for a professional finish.