

How to Fold a Zine. Your Ultimate Slit and Fold Guide

Key Highlights
- Learn to create a zine from a single sheet of paper using the simple slit and fold method.
- This guide shows you how to fold, cut a slit in the middle of the page, and assemble your zine easily.
- All you need to start are basic materials like paper, scissors, and a printer.
- Discover creative ideas to fill your zine, from collage and stickers to Photoshop designs.
- We'll cover everything from preparing your paper to designing the cover page and printing.
- Making a zine is a great way for young adults to express themselves and support mental health.
Have you ever wanted to create your own mini-magazine? A zine is a fantastic way to share your thoughts, art, or stories with the world.
Made from just a single sheet of paper, a zine can be about anything you care about. The process itself is both creative and personal, giving you space to explore ideas, experiment with design, and express what matters to you in a hands-on way.
This guide will walk you through the simple and rewarding process of making your very own slit and fold zine.
What is a Slit and Fold Zine?

A slit-and-fold zine is a type of miniature magazine created from a single sheet of paper. The magic is in the method: a series of specific folding steps combined with one strategic cut, or slit, allows the paper to be transformed into a small, multi-page booklet.
There’s no need for staples or complex binding. This technique is incredibly popular because it’s accessible, cheap, and easy to learn, making it perfect for beginners and seasoned creators alike.
The beauty of a zine lies in its versatility. You can fill its pages with personal stories, poetry, comics or collages, shaping it into whatever reflects your ideas and creativity. With nothing more than a single sheet of paper and a clever folding technique, you can transform simple materials into a powerful, self-made publication that brings your voice to life.
Interested in making your zine feel as unique as its content? Dive into practical sizing options and design freedom in this guide.
Watch the Zine Folding Method in Action
Prefer to watch the folding process in action? We’ve embedded a short overhead video tutorial that shows the full method from start to finish, so you can see exactly how a single sheet transforms into a neat eight-page mini zine. It’s especially useful for the trickiest part of the process: bringing the folds together in the centre and shaping the booklet cleanly without forcing the paper. Watching the movement unfold on screen can make the whole technique click in seconds.
The video works beautifully alongside the written guide. You can read the article for the full breakdown on materials, paper sizes, layout planning and creative finishing ideas, then use the video as a visual companion while you fold your own zine step by step. Whether you learn best by reading, watching or doing, this gives you both routes into the process, and gets you closer to a finished zine that feels crisp, clever and ready to print.
What Do You Need to Get Started with Folding a Zine?

Starting your first zine project is refreshingly straightforward and does not require specialist equipment. Most of the materials are commonly found at home or in a basic stationery drawer. With just a few simple tools, you can begin folding, designing and assembling your own miniature publication.
To keep things clear and easy to follow, here’s what you actually need:
1. Essential Tools
These are the only items required to create a basic slit and fold zine successfully.
- A single sheet of paper: Standard A4 printer paper works perfectly for beginners and is ideal for practising your folds.
- Scissors or a craft knife: You will use this to create the central slit that allows the booklet to form correctly.
- A pen or pencil: Simple writing tools are all you need to sketch ideas or add text to your pages.
- A printer (optional): Helpful if you want to print a digital layout or create multiple copies, but not necessary for a handmade version.
2. Creative Extras

These additions are optional and can enhance your design once you are comfortable with the basics.
- Colour tools: Coloured pencils, markers or highlighters can add personality and detail to your pages.
- Collage materials: Magazine cut-outs, printed images and a glue stick allow you to experiment with layered designs.
- Stickers or decorative elements: Optional additions that enhance the visual style and give your zine a handmade feel.
With these simple materials prepared, you are ready to begin folding and designing your own slit and fold zine with confidence.
What Paper Sizes Work Best for Slit and Fold Zines?

The paper size you choose determines the final dimensions, portability and overall impact of your finished zine. Because the slit and fold method uses a single sheet divided into eight panels, the starting size directly affects how large each page will be once folded. Choosing the right format early ensures your design, printing and folding process runs smoothly.
Here is a simple comparison to help you decide:
| Paper Size | Final Zine Dimensions (approx.) | Best For |
|---|---|---|
| A4 | A7 (74 x 105 mm) | Standard, highly portable mini zines and easy home printing |
| A3 | A6 (105 x 148 mm) | Larger, postcard-sized zines with more visual presence |
| Smaller or custom sizes | Varies | Unique mini formats and experimental designs |
1. Printing Considerations
Before printing, confirm that your printer supports the chosen paper size. A4 is the most convenient option for home printers, while A3 may require specific printer settings. Check ink levels as well, especially if your cover design includes bold colours or detailed graphics.
2. Audience and Portability
Think about how your zine will be shared. Smaller formats such as A7 are easy to carry, distribute and store, making them ideal for events or casual sharing. Slightly larger sizes offer more room for artwork and typography, creating a stronger visual impact but slightly less portability.
Selecting the right paper size from the start will make the folding process easier and help your finished zine feel intentional and well-proportioned.
Curious how paper choice affects the look and feel of your zine? Learn the key differences to pick the best paper to print zines in this guide!
How to Set Up Your Zine Page Layout Correctly
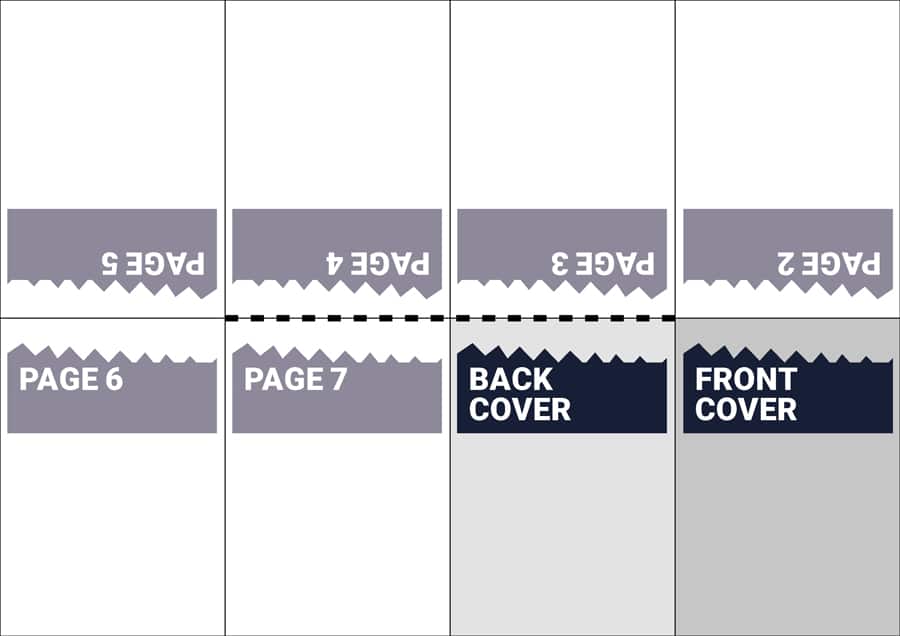
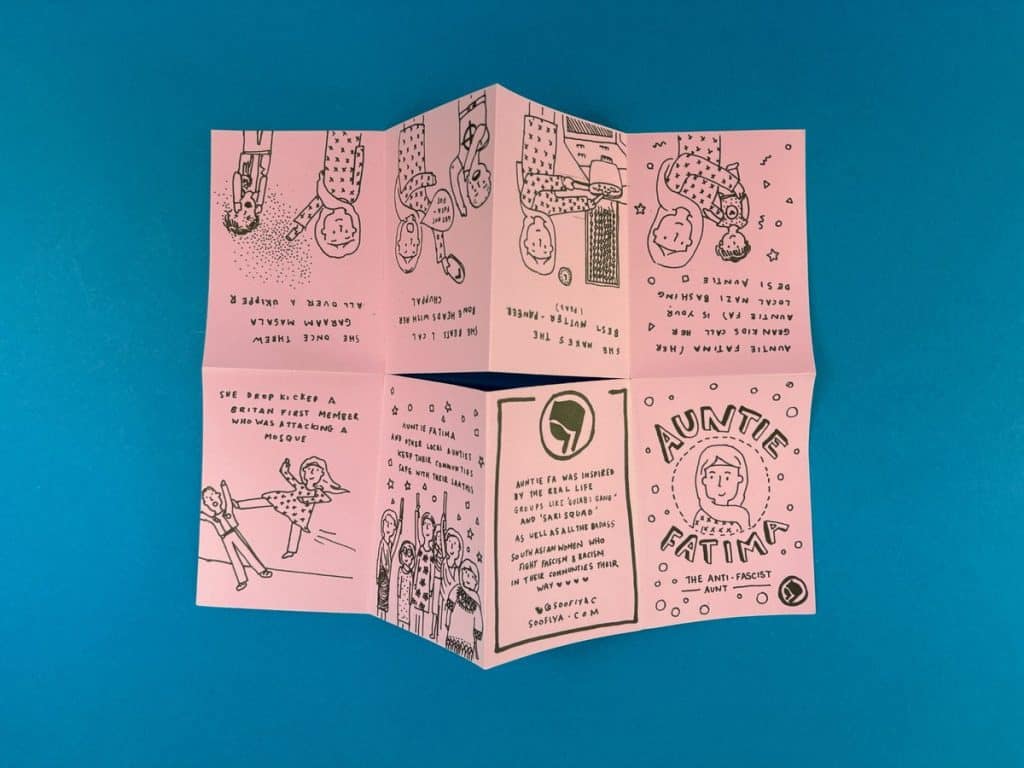
Before you start adding artwork, text or page numbers, it’s important to understand how the flat sheet will behave once it has been folded into a booklet. A one-page zine does not read in a simple left-to-right sequence while it is laid out flat. Instead, each panel has to be placed in a very specific position so that, once folded, the pages appear in the correct order. In this layout, the front cover sits on the lower far-right panel, while the back cover sits immediately to its left on the lower row. The remaining lower panels form the inside pages that follow through the booklet.
The four panels across the top row need to be designed upside down in relation to the bottom row. That might feel counterintuitive at first, but it is essential for the booklet to fold correctly and for the pages to read the right way up in the finished zine. Creating a quick paper mock-up first is the smartest move, because it lets you map the panels visually before committing to your final design. Once you understand where the covers, inside pages and inverted top-row panels belong, the whole layout process becomes far easier, and your finished zine will feel sharp, intentional and print-ready.
Step-by-Step Guide: How to Fold a Slit and Fold Zine?

Turning a single sheet into a small, eight-page booklet is easier than it looks. With a few careful folds and one central cut, you can create a neat mini publication ready for writing, drawing or printing. No glue or staples required.
Follow these clear steps below to master the technique.
Step 1: Gather Your Paper and Tools
Before starting, prepare everything you need so the process runs smoothly. You will need:
- One rectangular sheet of paper (A4 works perfectly).
- A pair of scissors (or craft knife, used carefully).
- A ruler for sharper creases (optional).
- Pens, pencils or decorative materials if you plan to design immediately.
Choose standard printer paper for practice, then experiment with heavier stock once confident.
Step 2: Create the Base Folds
This stage forms the structure of your booklet and explains exactly how to fold paper for a zine correctly.
- Place your sheet of paper flat on a table. First, fold it in half lengthways, matching the long edges together.
- Press down firmly to make a clear crease.
- Next, fold it in half the other way, matching the short edges together.
- Fold it the same way once more if you wish to create eight equal sections on the page.
Step 3: Make the Central Slit Safely
This is the crucial transformation step in learning how to fold paper into a zine.
- Fold the sheet in half widthwise (short edges together).
- Locate the centre crease along the folded edge.
- Cut from the folded edge along the middle crease line, stopping at the first vertical crease intersection.
Only cut through the middle two panels, no further. The slit should sit neatly in the centre of the sheet.
Step 4: Collapse and Form the Booklet
Now you’ll complete the structure and see how to fold a zine booklet properly.
➡️ Unfold the paper completely again.

➡️ Fold it lengthwise along the long central crease (the one containing the slit).

➡️ Hold each short end and gently push them towards one another. The slit will open into a cross or “mouth” shape.

➡️ Allow the sections to fold naturally inward, stacking into booklet form.

➡️ Fold the booklet in half to form a spine.
Press all edges firmly to secure clean folds. Your front cover should now sit correctly at the front.
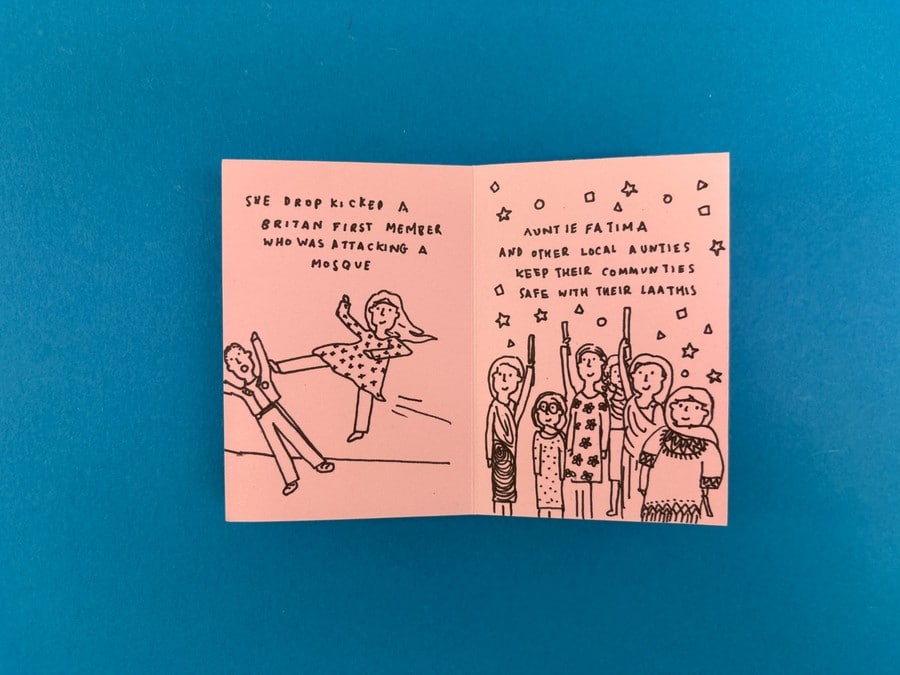
With just one sheet and a careful sequence of folds, you’ve transformed flat paper into a finished mini publication. Now fill it, print it or share it, and enjoy creating your own handmade zines.
How Can You Design and Finish Your Zine Creatively?

Once you have learned how to fold a zine (slit and fold zines), the most rewarding stage begins. Your blank booklet becomes a space for ideas, artwork and storytelling. Careful planning combined with creative freedom will help you produce a zine that feels thoughtful, original and well presented.
Follow the steps below to shape and refine your finished piece.
Step 1: Decide Your Theme and Creative Direction
Before adding any artwork or writing, take time to decide what your zine will focus on and the tone you want it to have. A clear theme gives structure and purpose to your pages, making the final result feel cohesive and intentional rather than random.
You might choose to explore one of the following ideas:
- Write poetry or short reflective pieces.
- Create a short illustrated comic strip.
- Share personal experiences or hobbies.
- Design fan art inspired by favourite books or films.
- Compile simple recipes or practical tips.
Whether you are practising how to fold a mini zine for enjoyment or improving how to cut and fold a zine accurately, meaningful content will always strengthen the finished booklet.
Step 2: Create a Numbered Mock-Up to Plan Layout
Proper page planning is essential if you want a clean and professional outcome. This is particularly important when learning how to fold a one-page zine, as the panels appear in a different sequence once the sheet is unfolded and laid flat.
To prepare your layout guide, follow these steps:
- Fold a blank practice copy completely.
- Number every page clearly in pencil.
- Draw a small arrow on each page to indicate the correct orientation.
- Unfold the sheet and review how the numbered panels appear when flat.
This mock-up will act as a reliable template and will prevent upside-down pages, misplaced artwork or unexpected layout issues.
Step 3: Align Text and Images with Care and Precision
Achieving a polished appearance depends on accurate alignment, thoughtful spacing and an understanding of your fold lines. When designing on the unfolded master sheet, you must pay close attention to the eight sections created by your folds so that nothing important is trimmed or hidden.
Keep the following in mind during layout:
- Ensure all essential text remains within panel boundaries.
- Avoid placing important details directly across fold lines.
- Leave small margins near the outer edges of each panel.
- Use a digital grid if designing on a computer.
- Complete a test print before producing final copies.
This approach is helpful whether you are practising how to fold a zine A4 for standard printing or experimenting with how to fold a zine A3 for a larger format design.
Step 4: Experiment with Materials and Creative Techniques
Zines provide freedom to explore different artistic styles and materials, allowing you to create something that reflects your personality and creative voice. Mixing techniques can add texture, contrast and visual interest throughout the booklet.
Consider experimenting with:
- Collage using magazine cut-outs and glue.
- Stickers, stamps or patterned paper.
- Hand lettering and illustrated titles.
- Digital layouts you'll prepare before printing.
- Different paper weights or finishes.
Once you are confident in how to fold a mini zine accurately, trying new materials can elevate the overall look and feel of your publication.
Step 5: Consider Colour Choices and Hidden Details
Thoughtful colour choices and layout decisions can enhance readability while adding personality to your zine. Although the slit and fold format usually uses a single-sided sheet, you can still incorporate creative surprises into the design process.
You might choose to include:
- A hidden full-page poster that is revealed when unfolded.
- A background pattern that is printed on the reverse side.
- A secret message for readers to discover.
- High-contrast imagery for clear black and white printing.
Remember that colour printing is generally more expensive than black and white, particularly if producing multiple copies. Planning ahead will help you balance cost and creativity effectively.
Designing a zine combines structure with imagination. Once you understand the folding method and page arrangement, you can confidently experiment and produce a finished piece that is both technically precise and creatively expressive.
Thinking zines are just for indie creatives? Discover how brands and agencies are using them to connect with new audiences in this guide!
Ready to Print Your Zine with Ex Why Zed?
At Ex Why Zed, we live and breathe zine printing. Whether your project features photography, illustration, writing or bold graphic design, we make self-publishing simple and exciting.
Just send us your PDF, and we handle the rest, from free file checks to expert advice from real humans. Enjoy stapled zines delivered in three days or perfect-bound editions in five, plus free UK tracked delivery and optional storage and fulfilment.
Explore inspiring case studies, request free paper samples and follow our easy Print Journey guides to get started with confidence.
We print the zines you love. Contact us today to get a quote and start your print journey!
Conclusion
Folding a zine using the slit and fold method is not just a fun, creative exercise; it’s an opportunity to express your thoughts and ideas in a tangible format. With the right materials and techniques, you can craft a unique piece that reflects your personality and artistic vision.
Remember to be patient with the folding process, and don’t hesitate to experiment with different designs and layouts to make your zine truly yours. Whether you’re making a mini zine or an A4 masterpiece, the joy of creating something by hand is unparalleled.
Frequently Asked Questions
How many pages does a typical slit-and-fold zine have?
A standard slit-and-fold zine made from one sheet of paper always contains eight pages. These include a front cover, a back cover and six interior pages. The folding process divides the sheet evenly before one central cut forms the booklet.
What are common mistakes to avoid when folding a zine?
One common mistake is cutting beyond the centre crease, which weakens the structure. Another is making uneven folds that cause misaligned pages. Always crease carefully, line up edges precisely and stop cutting exactly at the marked fold intersections.
Is the slit and fold method suitable for double-sided printing?
The slit-and-fold method is traditionally designed for single-sided printing. However, you can print on the reverse side to create hidden artwork or bonus material revealed when unfolded. Careful alignment is essential to prevent upside-down or misplaced content.
How do I make sure my images and text appear in the right order?
Create a blank folded mock-up before designing your final version. Number each page clearly from one to eight, then unfold the sheet. This layout guide shows exactly where to position text, images and any upside-down elements.
Are there tips for making sure the pages line up correctly when folding a zine?
Yes. Always start with precise initial folds, aligning corners carefully before creasing firmly. Use a ruler to sharpen folds if needed. Smooth the paper flat before collapsing it into booklet form to prevent shifting and uneven page edges.
What size paper works best for making a one-page slit-and-fold zine?
Standard A4 paper works best for most beginners because it fits home printers and folds into a compact booklet size. A3 paper creates larger pages and bolder layouts. Any rectangular sheet works if the proportions remain consistent.
How to fold a quarter zine?
A quarter zine is made by folding a sheet in half, then in half again, creating four sections. Instead of cutting a central slit, you keep the folds intact. This produces a simple four-page booklet structure.
How to fold an 8-page mini zine?
Fold the paper lengthwise, then widthwise twice to create eight equal panels. Unfold, cut along the centre crease between the middle panels, then refold lengthwise and push the ends together to form the booklet.